Property Manager
The Property Manager lists all properties in the currently open dataset and replicates all the functions of the
The options and functions listed will only be available if you are the owner of the dataset or have at least Modify permissions to it
From the Property Manager it is possible to:
- View a list of properties in dataset
- Add a Property
- Edit a Property
- Edit the Number format of a property
- Edit the Number Buckets of a property
- Duplicate Property
- Delete a Property
- Reorder Properties
- Tag a property
- Create Expression Properties
- Create Lookup Properties
- Create an Expression Lookup
To access the Property Manager within Workspace select the Manage Properties option from the Data Menu or the Manage Property option from the Worksheet Column Menu
Once opened the Property Manager shows all the properties present in the dataset containing :
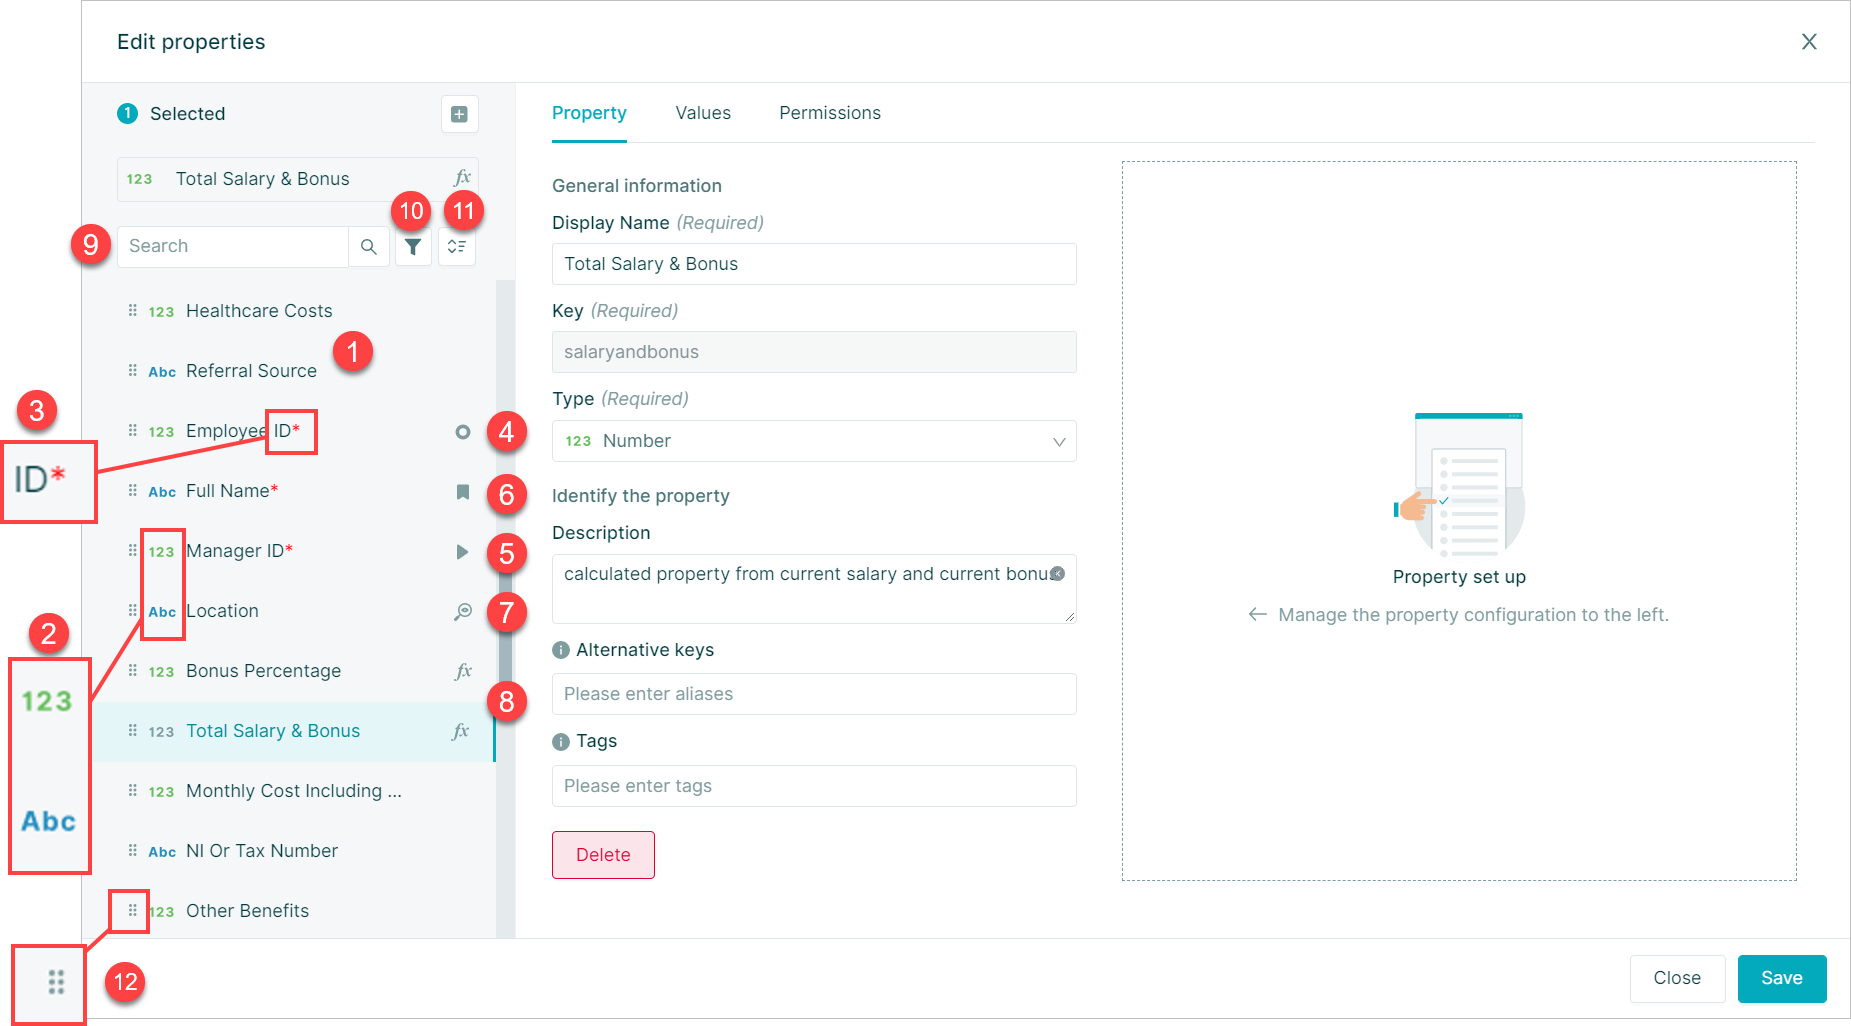
- Property Name
- Property Type
- Property Required Asterisk
- icon
- icon
- icon
- Lookup Property icon
- Expression Property icon
- Search Property box
- Filter Properties button
- Sort Properties button
- Reorder Properties button
Property Keys
A property key is a unique identifier for each property in your Orgvue dataset and is :
- Unique – Each property must have a key that's different from all others in the dataset.
- Used in Gizmo expressions – Property keys are how you reference properties in calculations and expressions.
- Auto-generated – When you add a new property, the key is generated automatically from the display name. You can edit it before saving.
- Non-amendable after saving – Once a property is saved, its key can't be changed. Edit it before saving if needed.
Important rules
Keep these constraints in mind when creating or editing a property key:
- Case sensitivity – Property keys can be case sensitive.
- No leading underscore – A custom property key can't begin with an underscore
_ - No periods – Don't include a period
.in a property key. Gizmo uses dot notation to separate functions in expressions, which would cause conflicts. - No leading or trailing spaces - Whilst it is possible to include spaces within your property key you must ensure they do not occur at the start or end of the key
When you duplicate a property, the key defaults to the original name with _copy1 appended. You can edit this before saving.
Alternative property keys
You can add a second key—, called a property alias for use in Gizmo expressions alongside the primary key. This is especially useful when a property key contains multiple words, making expressions easier to write. Some properties are assigned an alias automatically when a dataset is used with a Template Pack.
Add Property
It is possible to add a property to an existing dataset from the Property Manager screen
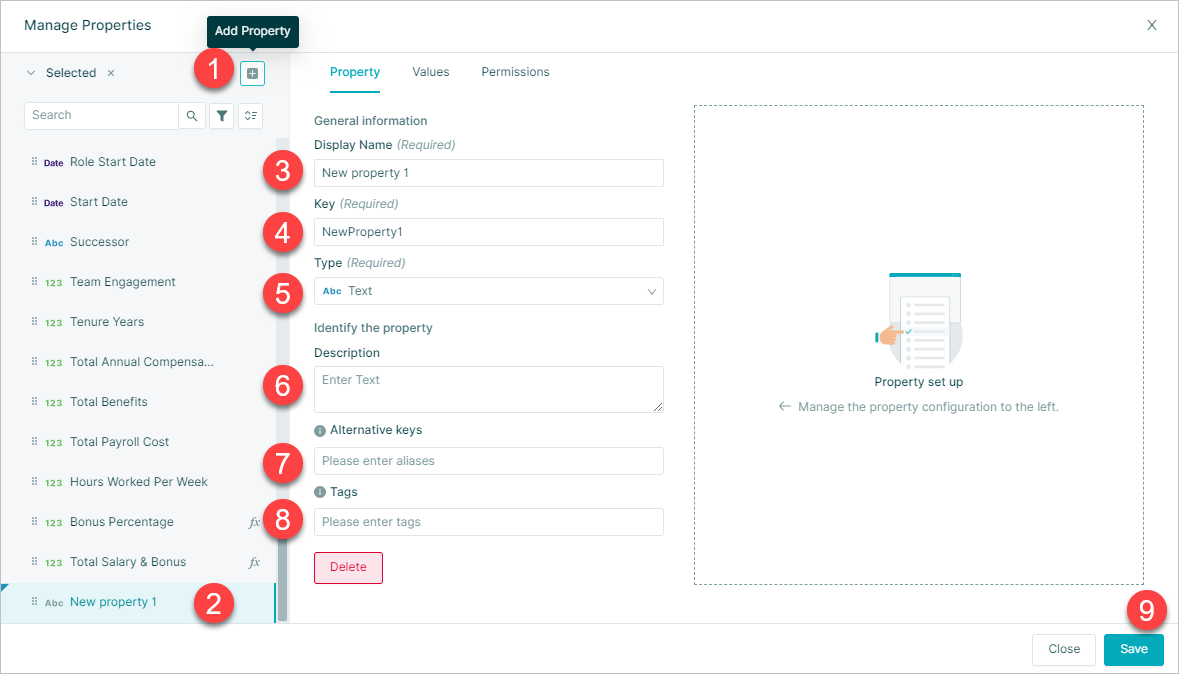
To do this:
- Select the
Add Propertybutton - This will add a new property into the property list
- Enter Display Name*
- Amend Property Key from generated value if required*
- Select Property Type*
- Enter text to describe the property if required
- Enter Alternative Keys if required
- Enter Tags if required
- Select
Saveto save the new property
*Mandatory field
If Number, Date or Boolean Property types are selected in 5' then additional selections can be made to format the Property
Click below to view a short video on adding properties in the Property Manager

Edit Property
Existing properties may be edited by selecting the required property on the property manager
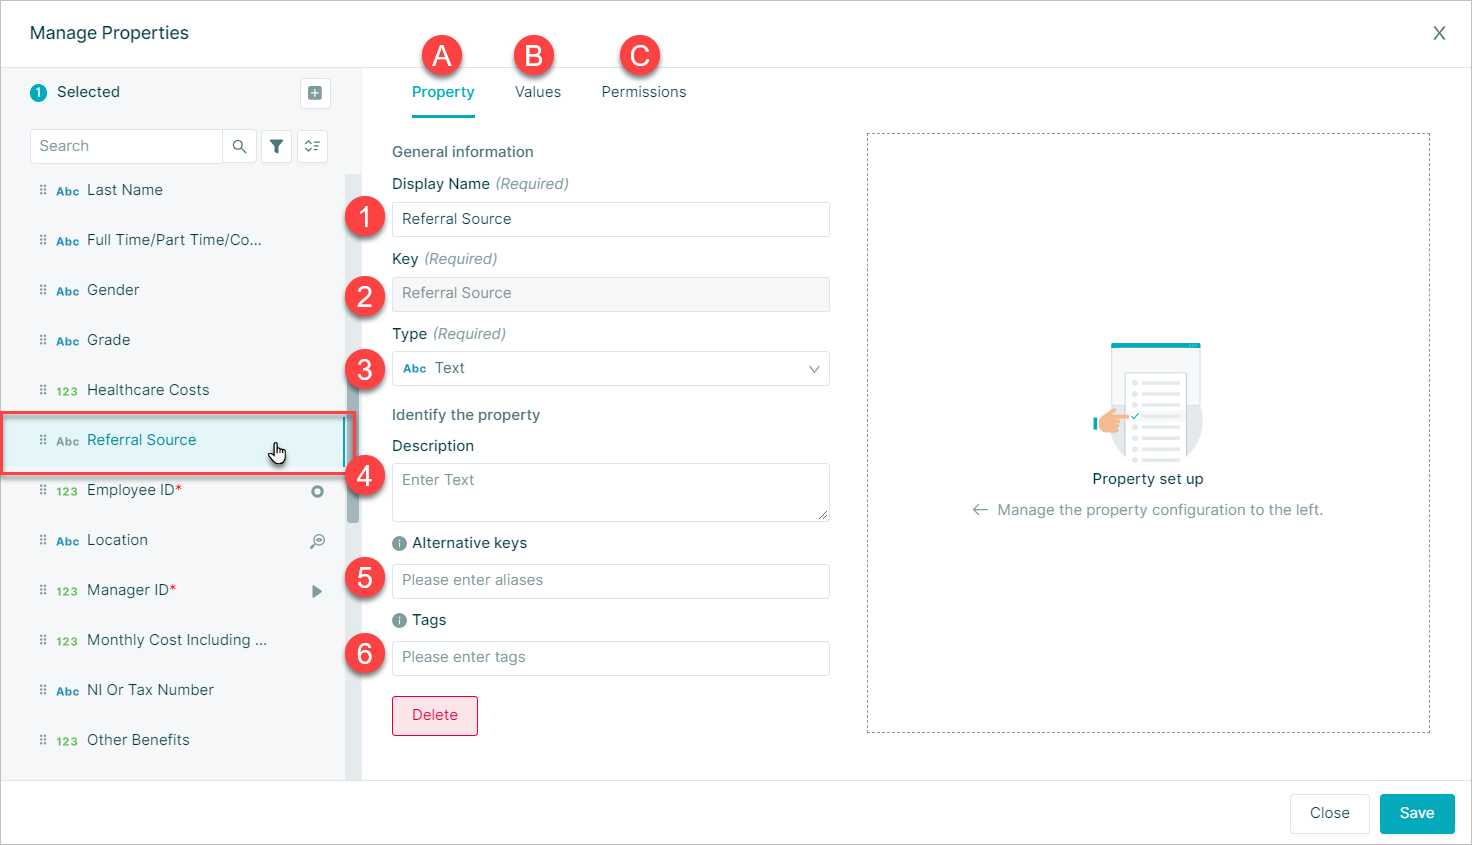
This will open the Edit Properties Window containing for the selected property with three tabs
- A. Property
- B. Values
- C. Permissions
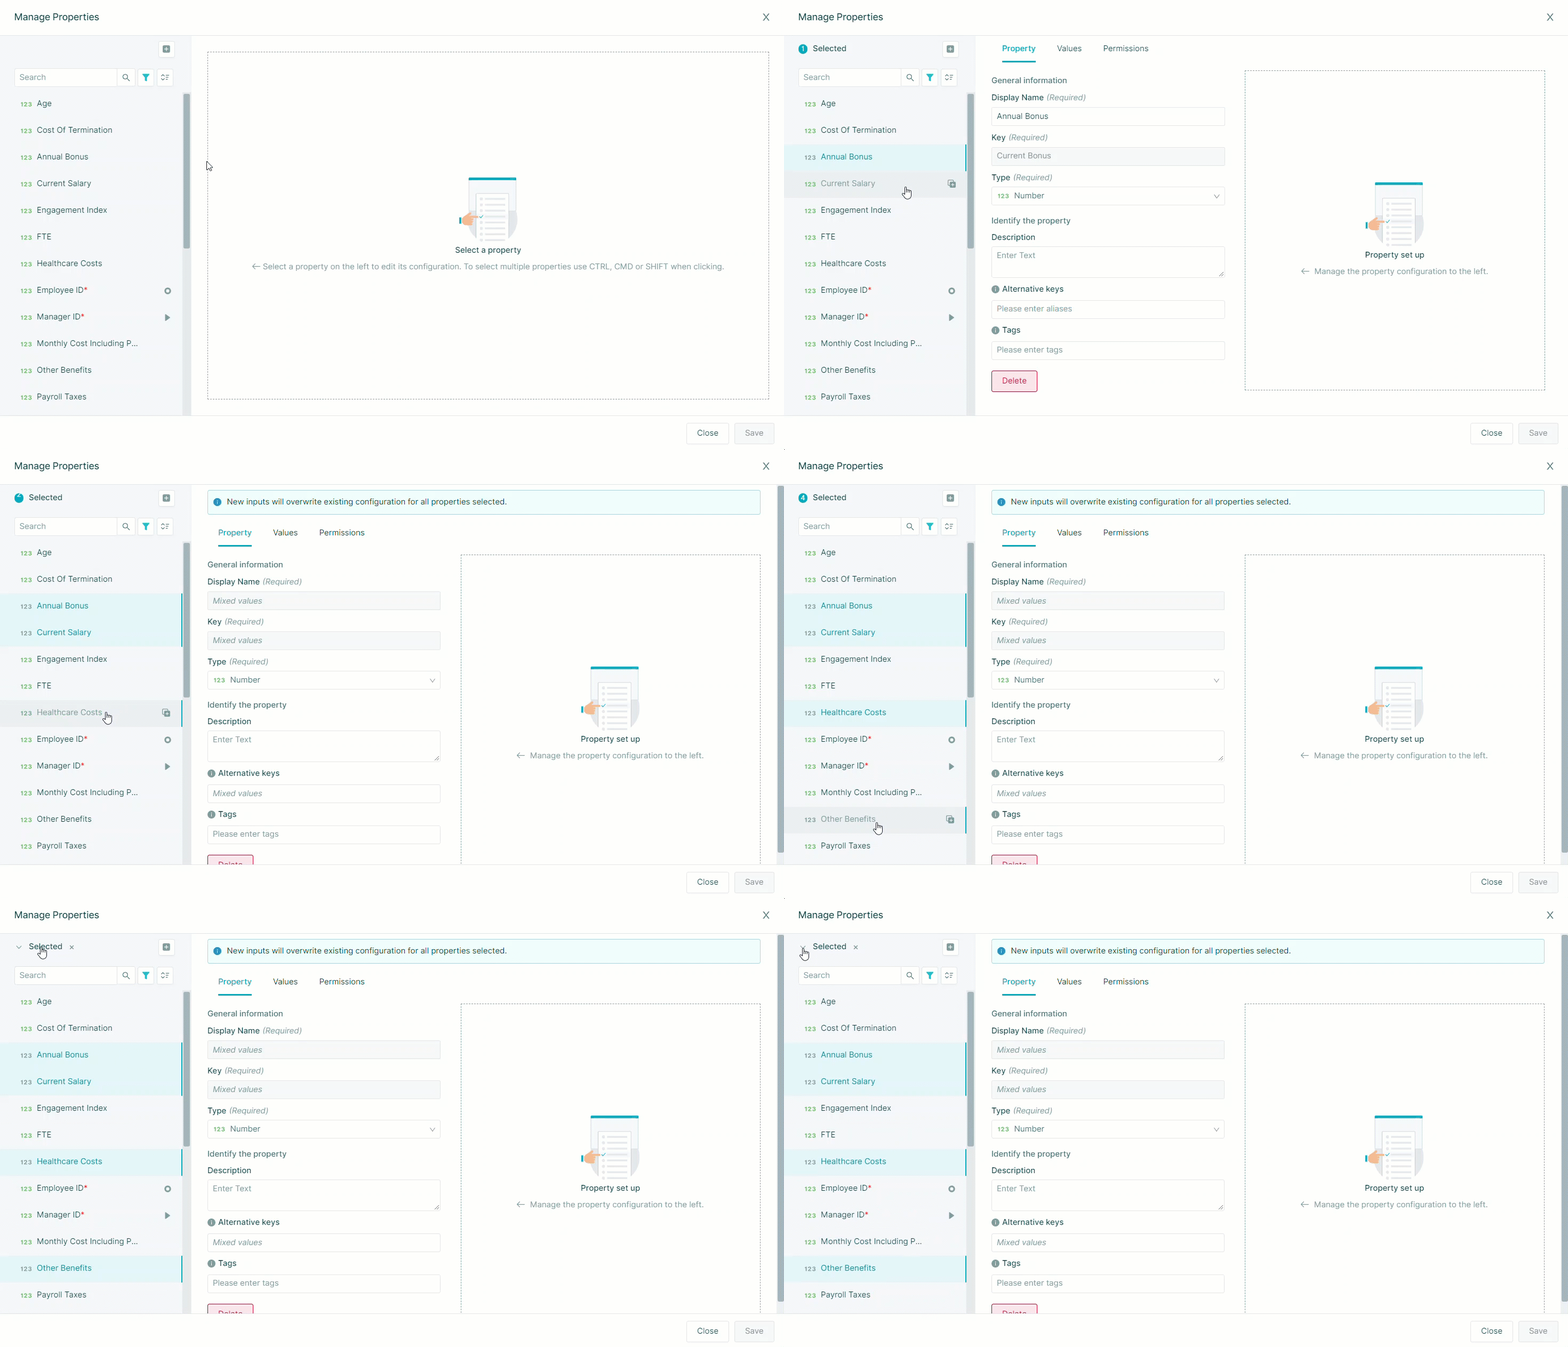
Multi Select Properties
When editing properties it is possible to select multiple properties to edit at the same time
This can be useful to save time when adding the same Tag to several properties or editing the Number Format or Date Format for several properties together
To select multiple properties to edit CTRL + Select (CMD + Select on Mac) the required properties
To select a range of properties:
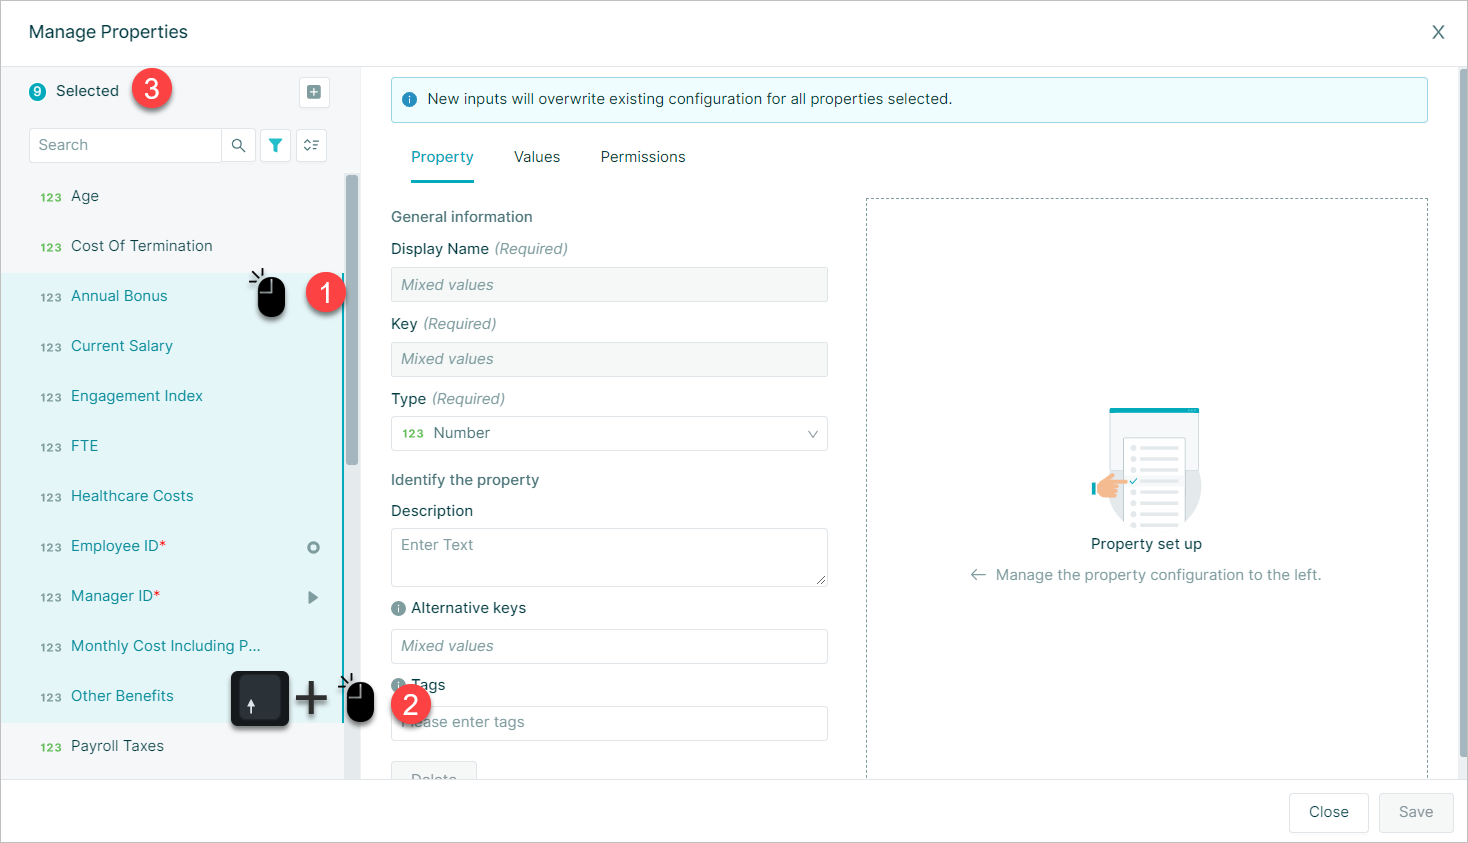
- Select the first property in the range
Shift + Selectthe last property in the range- All properties in range will be selected
The two methods of multi selecting properties may be combined so that a range of are selected using the Shift + Select method with additional properties selected or unselected using CTRL + Select
Property Tab
The property tab contains the following fields:
- Display Name*
- Key* (Non-amendable)
- Type*
- Description
- Alternative Keys
- Tags – free text field to enter any Property tags. See and Property Tags for more details
*Required field
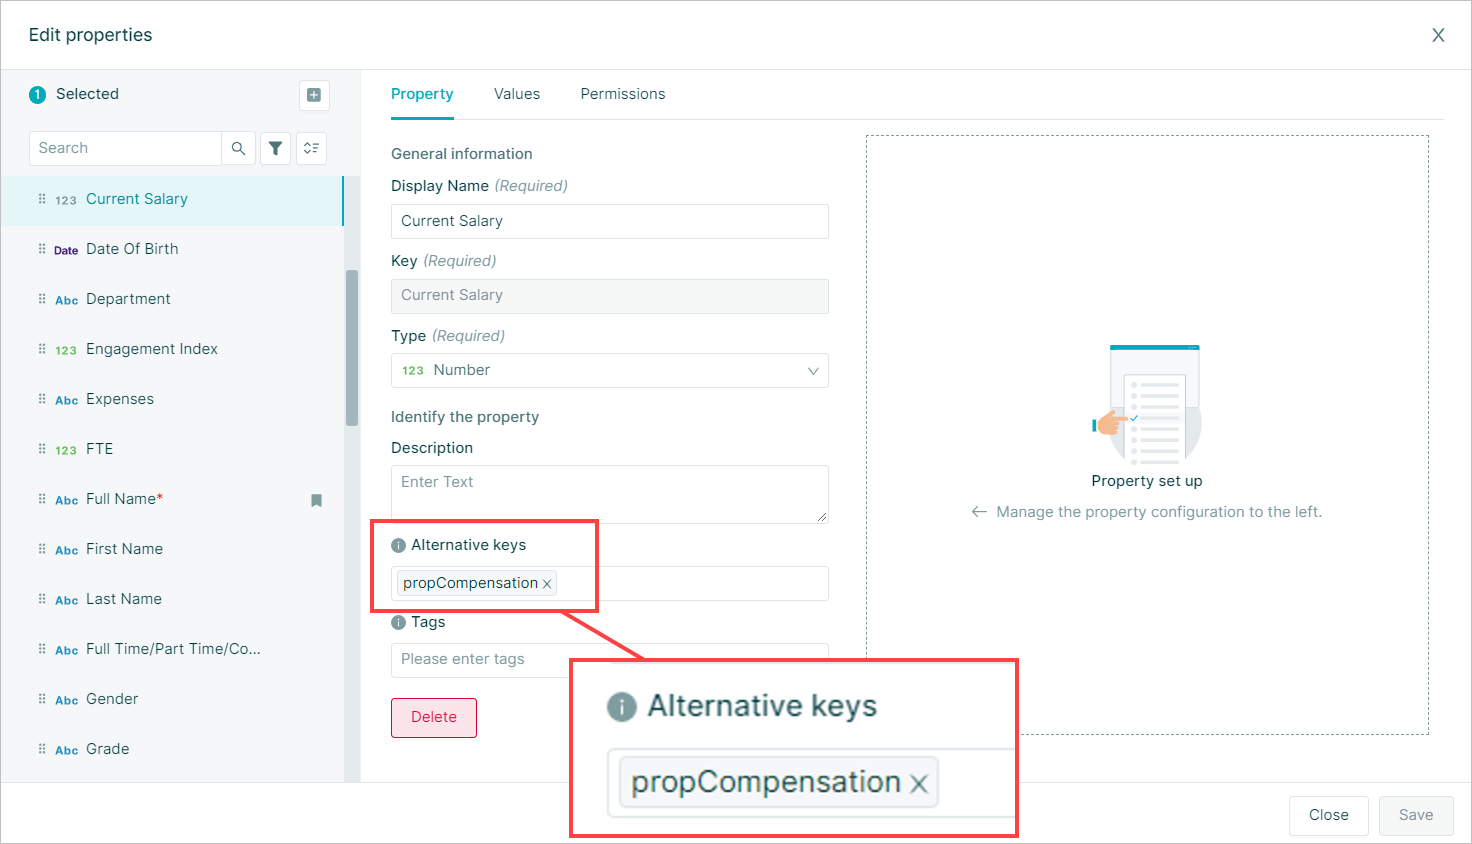
Alternative Property Keys
An alternative property key or property alias allows the addition of a second property key for use in Gizmo Expressions this is often useful if the property key contains more than one word to make writing expressions simpler
In addition, alternative property keys will be automatically assigned to some properties when the dataset is used with a Template Pack
Property Tags
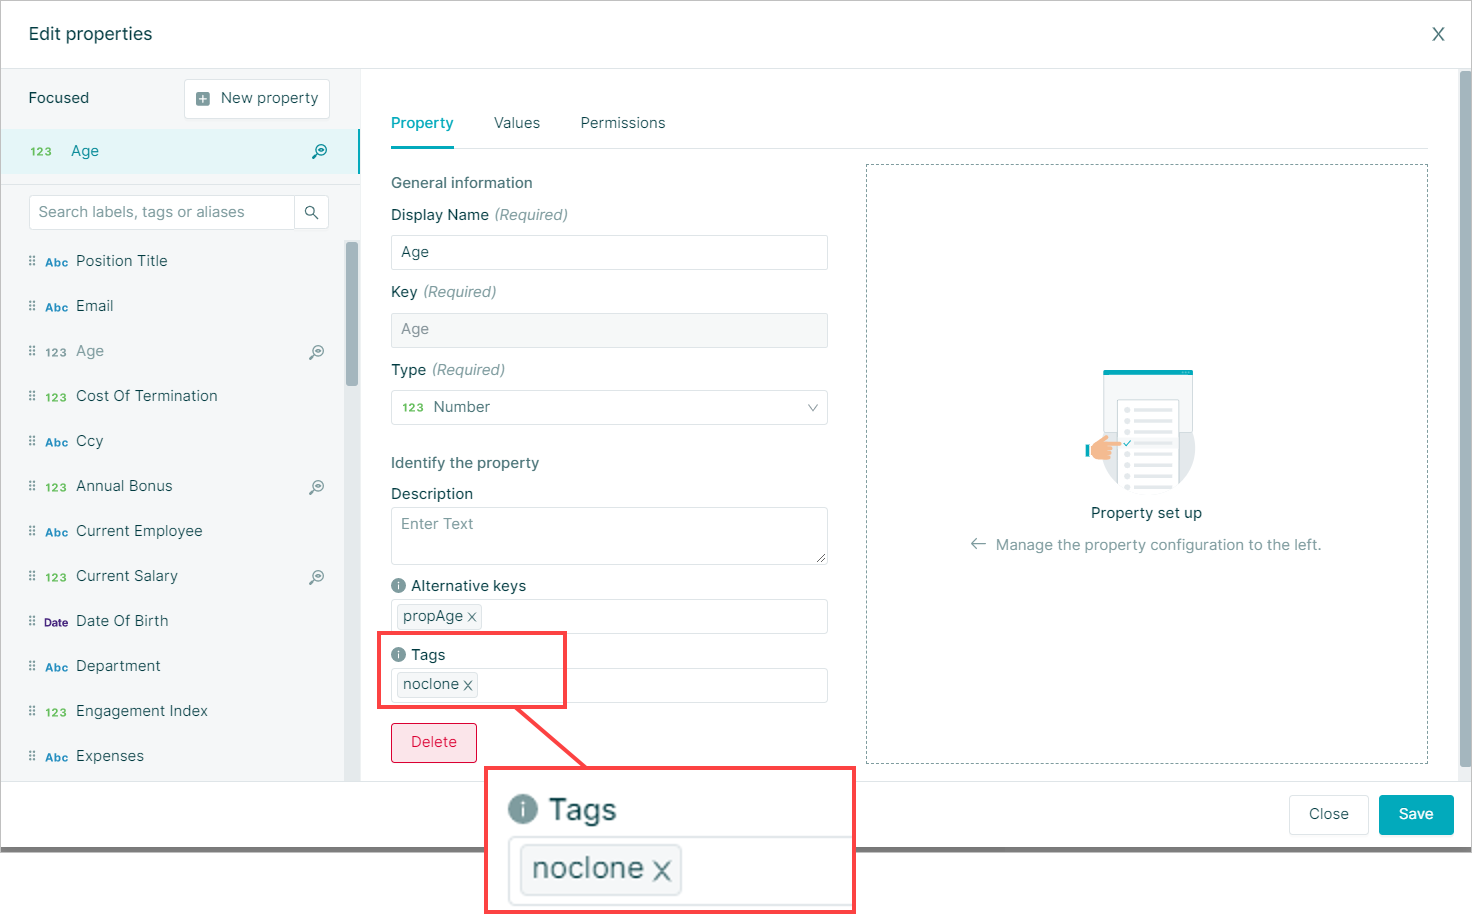
Property tags are available to provide specific functions within Orgvue or free text tags may be used to sort or categorize properties
To tag a property enter the required and then Save
Values Tab
Choose how values are populated and displayed
The value tab contains:
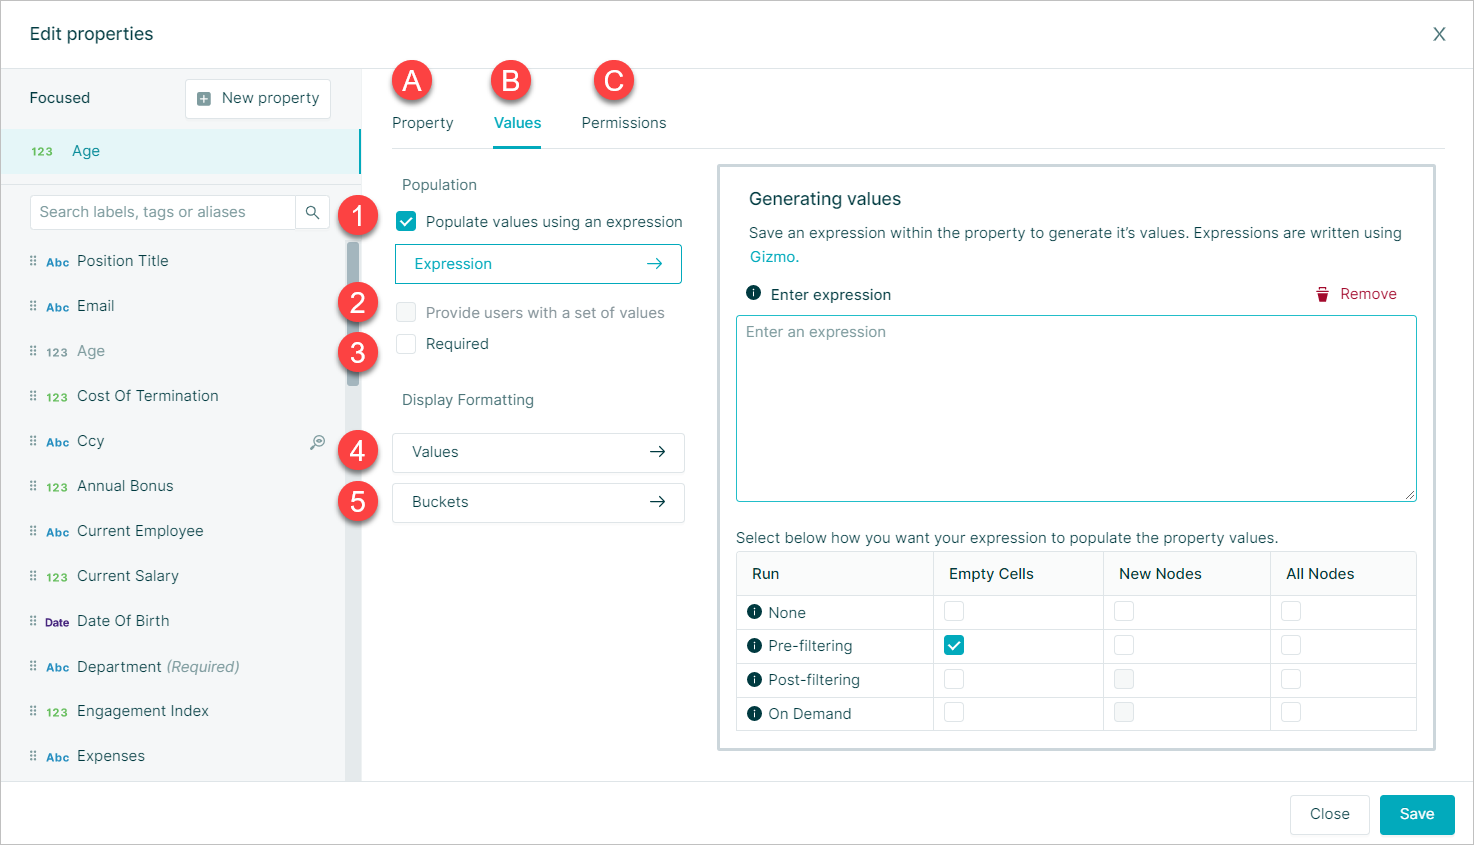
- Expression
- Input Options * Text properties only
- Required Property
- Display Formatting : Values
- Buckets * Number properties only
Input Options
The inputs options are displayed if the Provide users with a set of values checkbox is selected
It provides the ability to choose where Orgvue should provide input values from
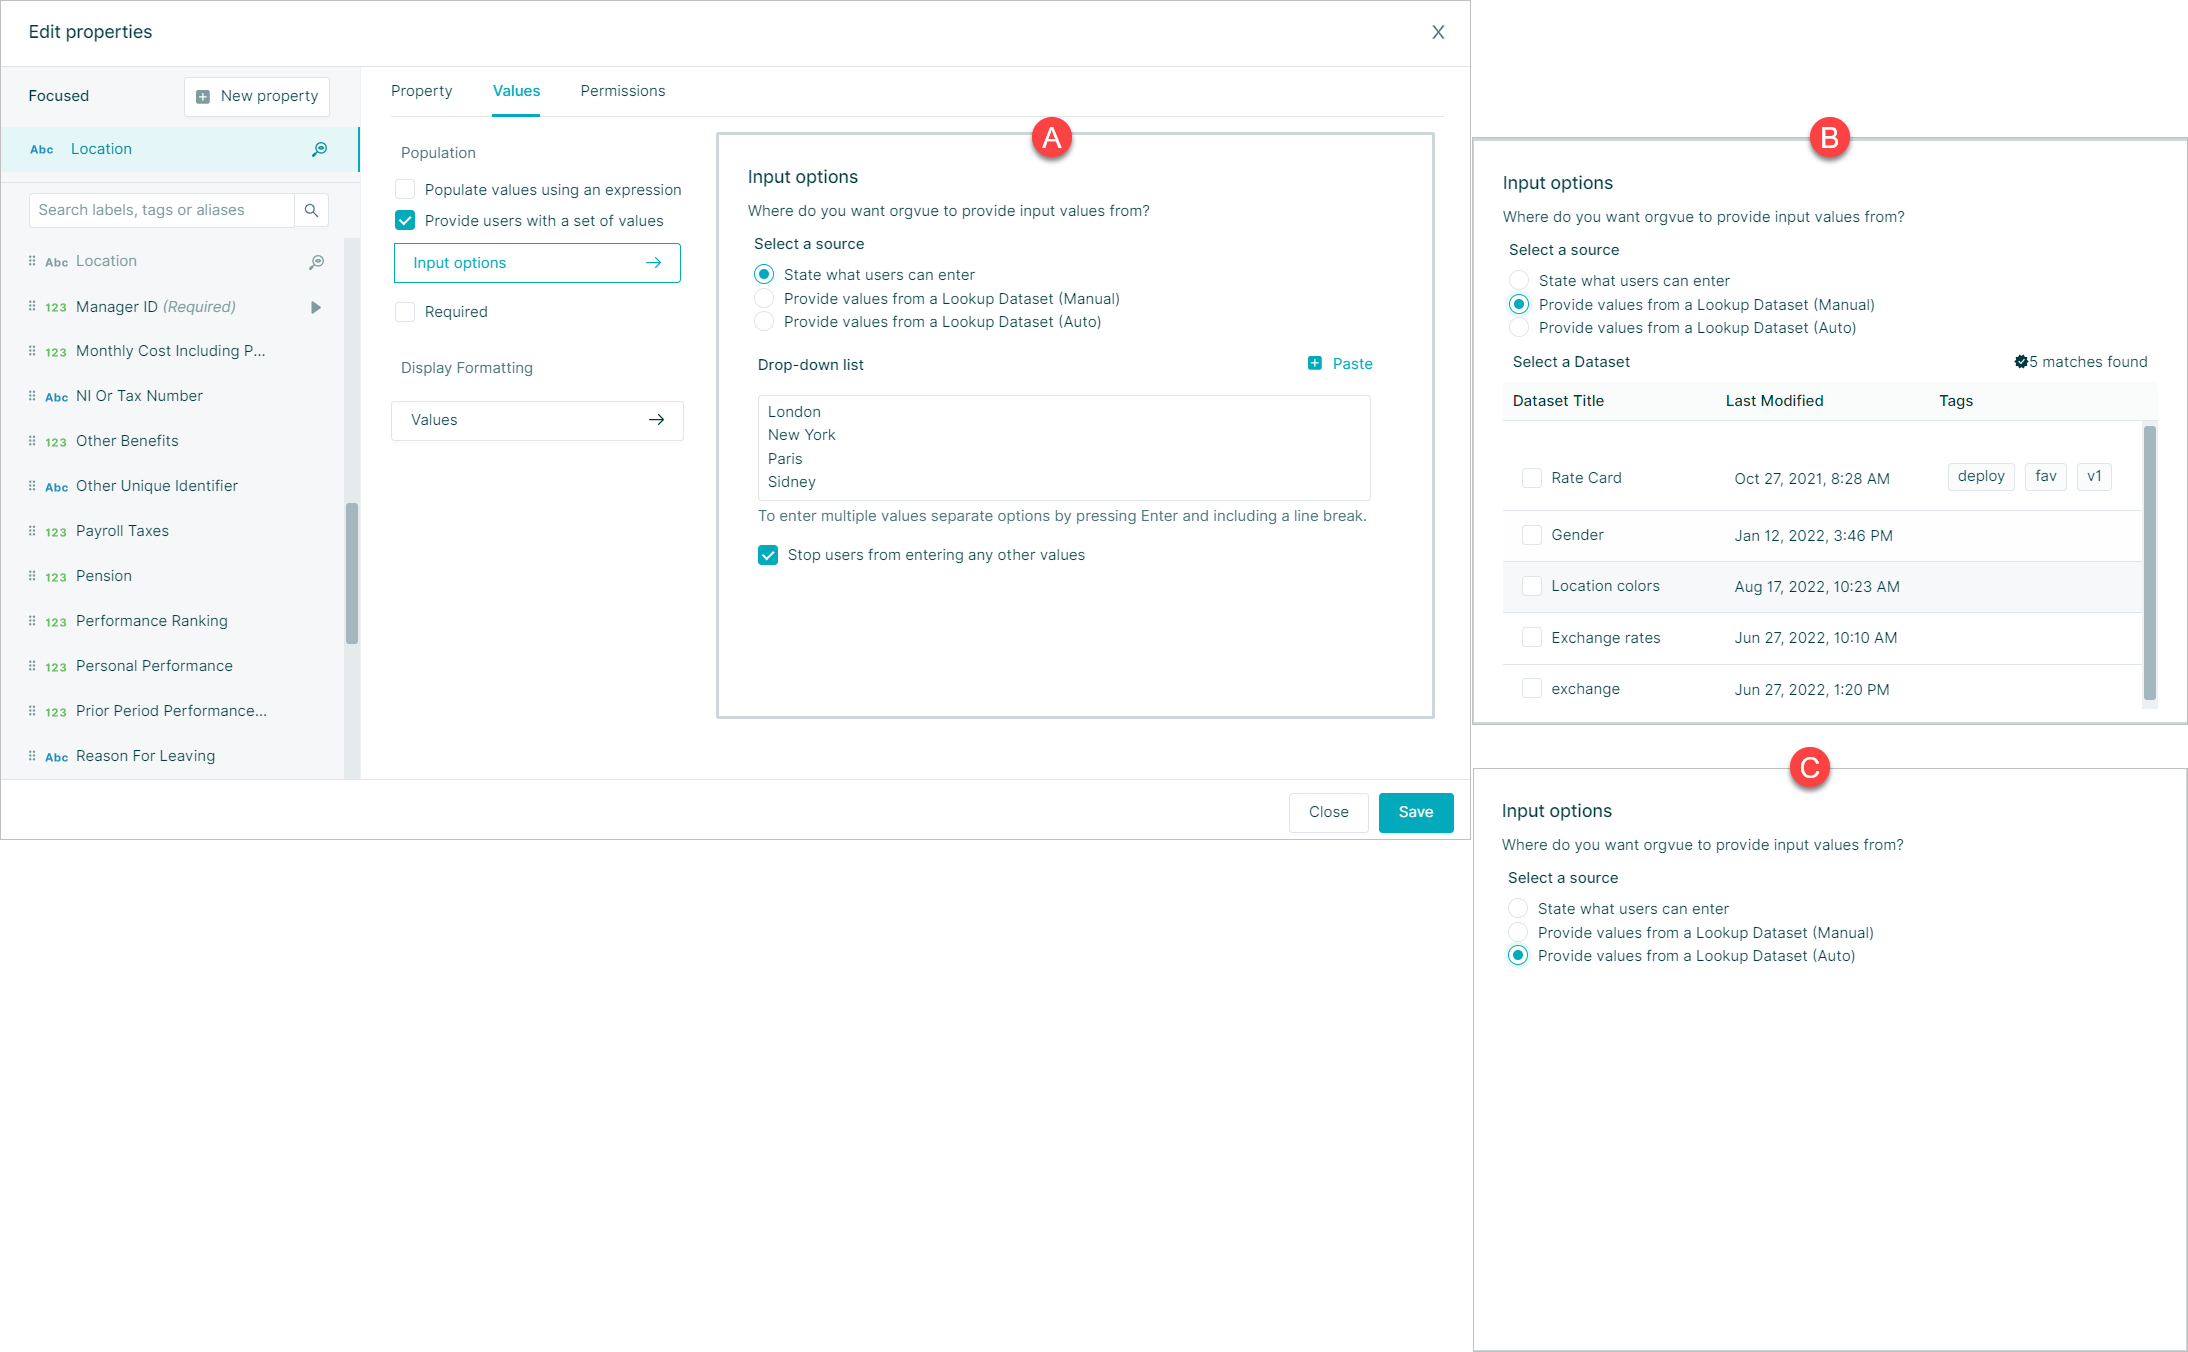
Either:
- A. State what values users can enter by entering values into the
Drop-down listbox and pressingEnterfor each option to include a line break - B. Provide values from a Lookup Dataset(Manual)
- C. Provide values from a Lookup Dataset(Auto)
Required Property
Selecting the Required checkbox will mark the property as a required one when creating new nodes
Values
The values section details how the property will be displayed
Text Format
For Text type properties it is possible to set the format to be displayed within Orgvue as either
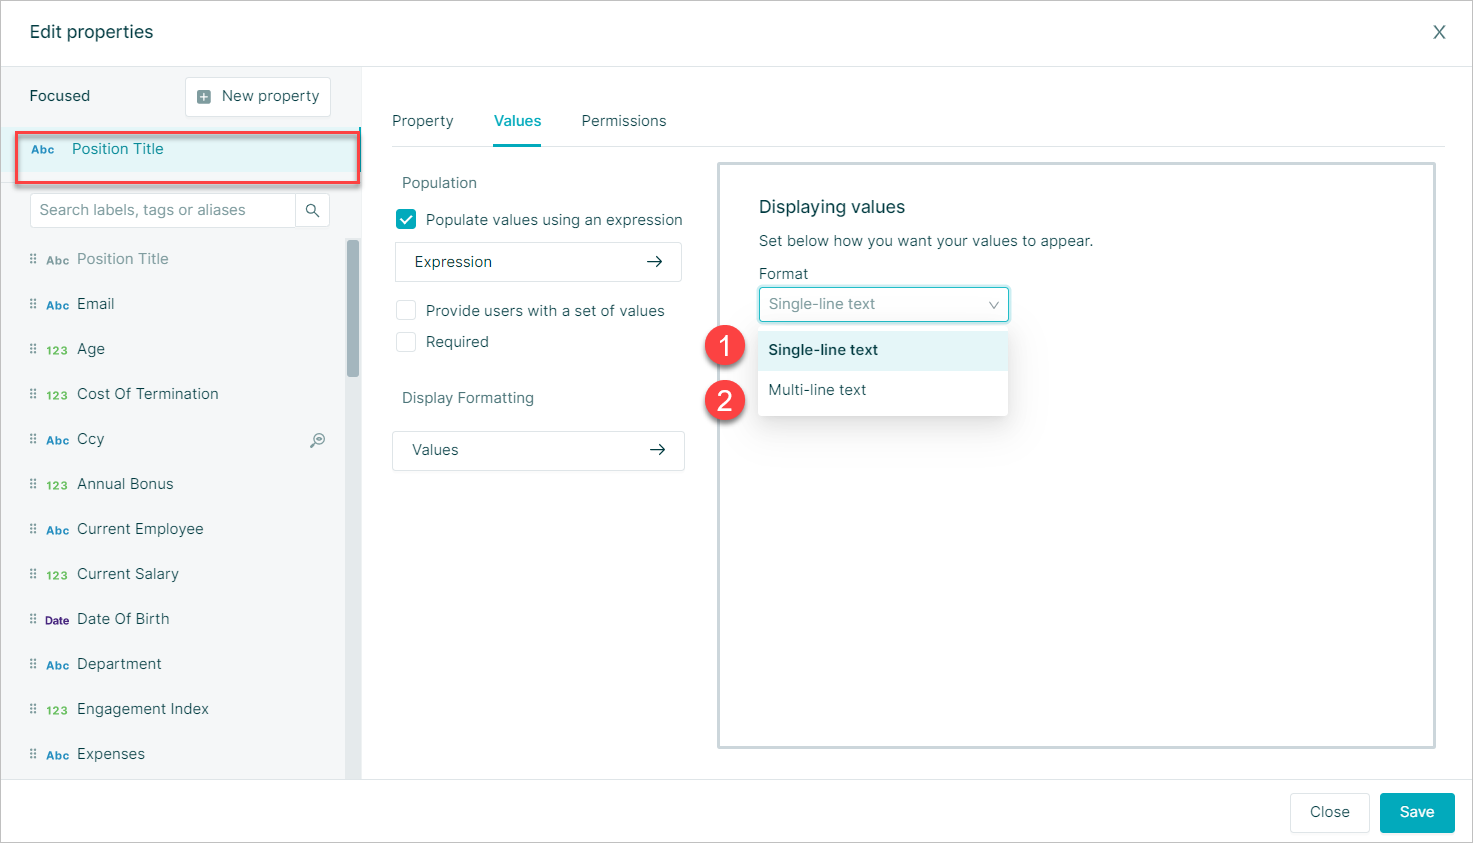
- Single-line Text
- Multi-line Text
Date Format
For Date type properties there are multiple options to set how the date will be displayed in Orgvue within charts, filters and paging
Worksheet cells will always display as either dd MMM yyyy or MMM dd yyyy depending on the Language Options selected
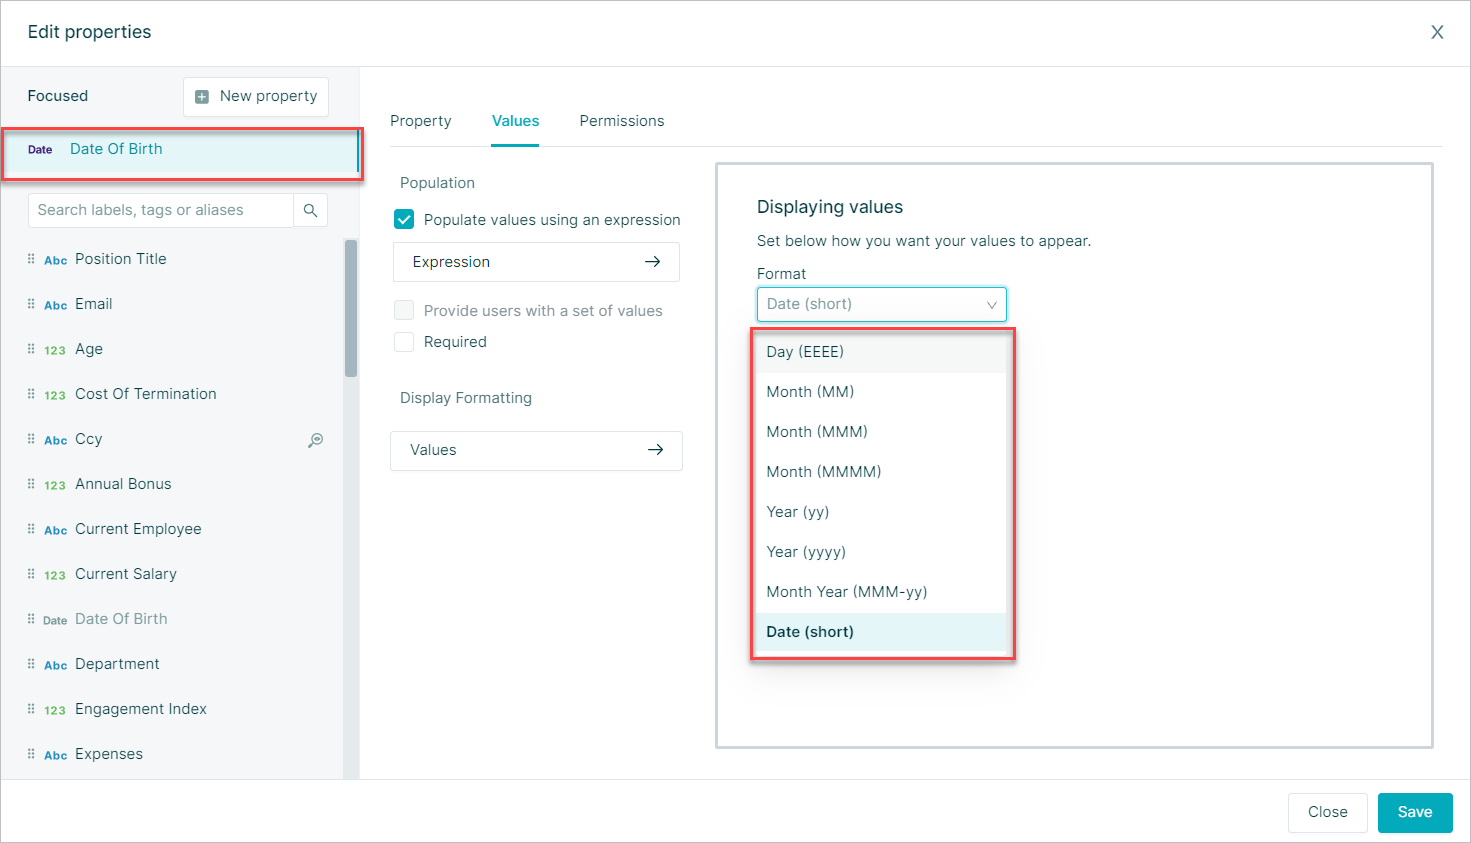
The table below provides the output shown in Workspace for each date format option for both Language Options
Each example is based on the input date Wednesday 12 October 2022
| Format | Output English (UK) | Output English (US) |
|---|---|---|
| Day(dd) | 12 | 12 |
| Day (E) | Wed | Wed |
| Day (EEEE) | Wednesday | Wednesday |
| Month (MM) | 10 | 10 |
| Month (MMM) | Oct | Oct |
| Month (MMMM) | October | October |
| Year (yy) | 22 | 22 |
| Year (yyyy) | 2022 | 2022 |
| Month Year (MMM-yy) | Oct-22 | Oct-22 |
| Date (Short) | 12/10/22 | 10/12/22 |
| Date (dd MMM yyyy) | 12 Oct 2022 | Oct 12, 2022 |
| Date (dd MMMM yyyy) | 12 October 2022 | October 12, 2022 |
Language selection in Orgvue is overridden by browser language settings
Boolean Format
For Boolean type properties there are 3 display options
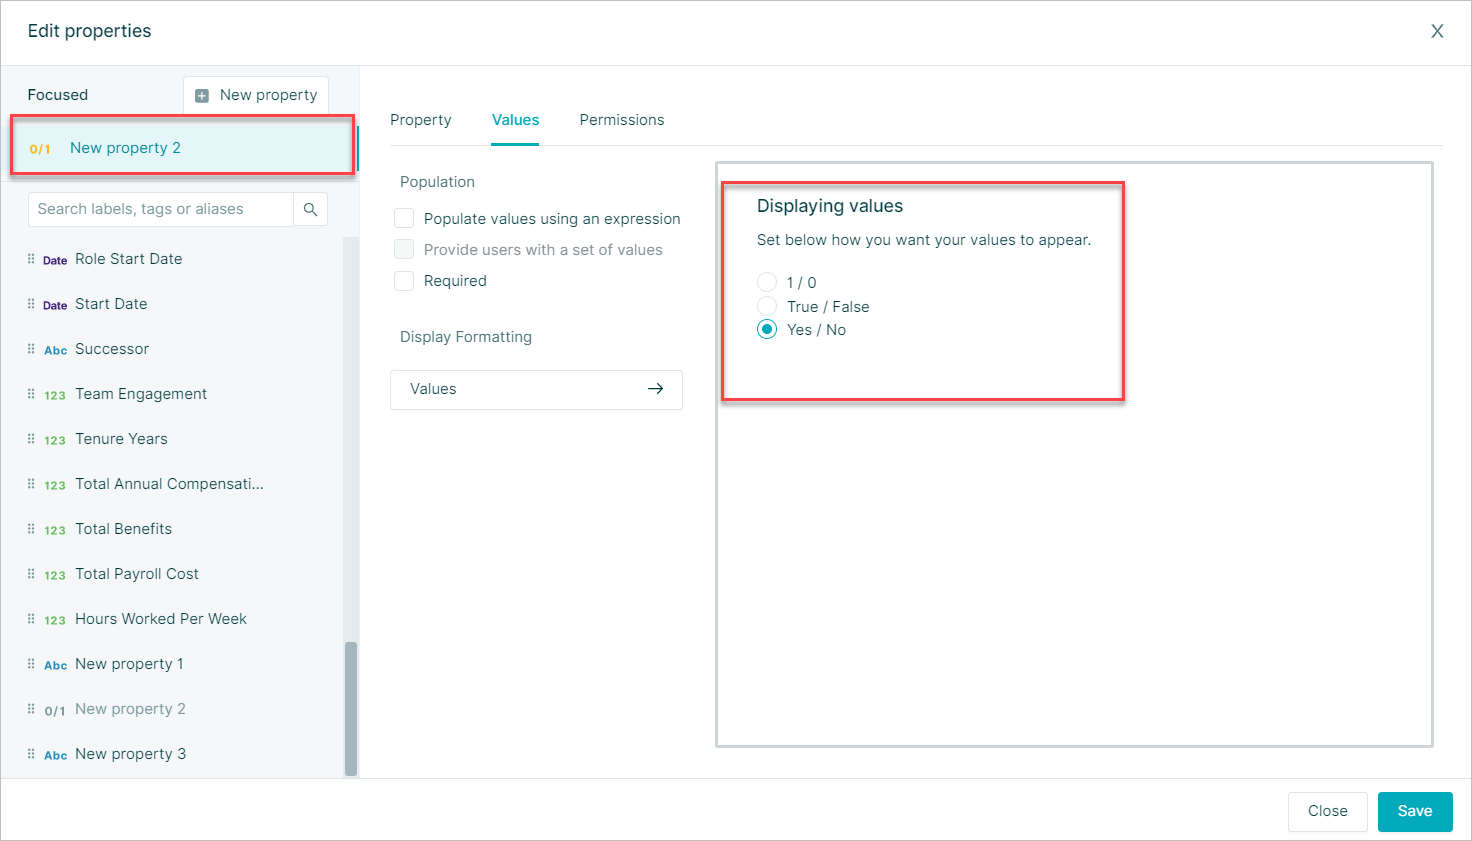
- 1 /0
- True / False
- Yes / No
Number Format
For Number type properties it is possible to set the format for the number to be displayed within Orgvue by
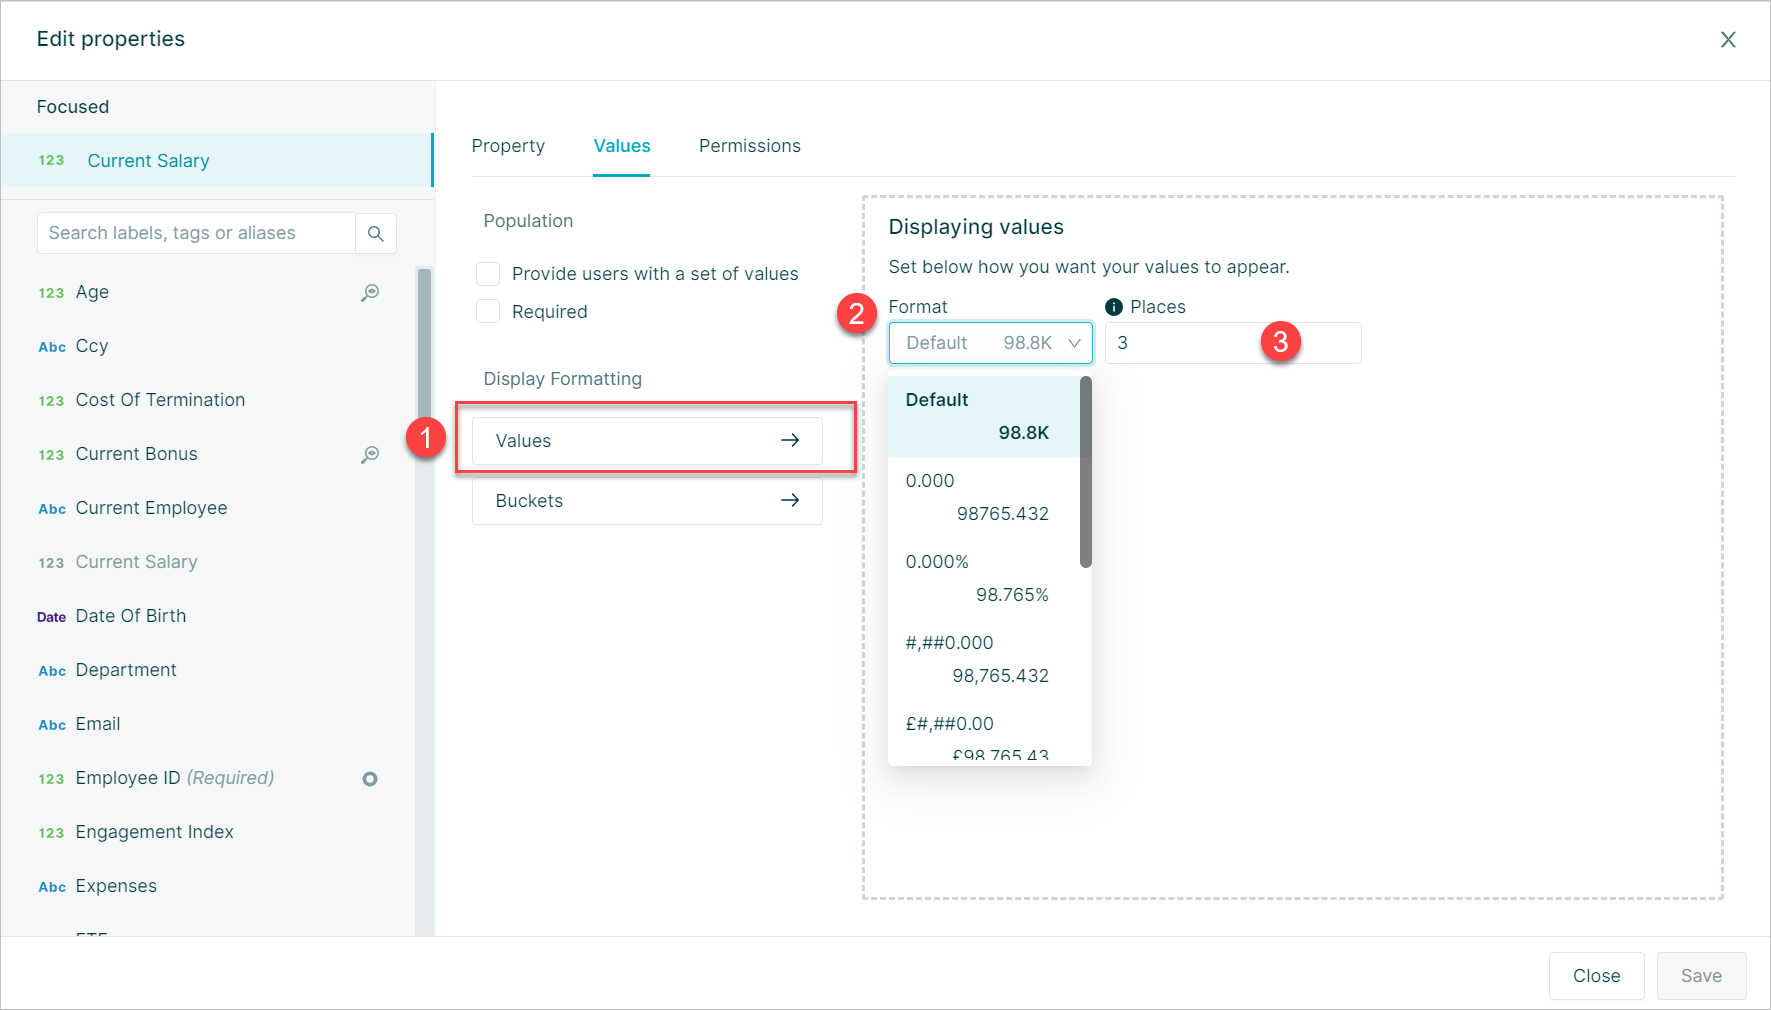
- Select
ValueswithinDisplay Formatting - Format: Use the Dropdown list to select required number format
- Places: Used in conjunction with format to define the number of decimal places displayed
Note: Places only applies to displayed values any decimal places will still be shown in Gizmo expressions
Number Buckets
Number buckets define how data will be grouped when viewed on filter panels and visualizations
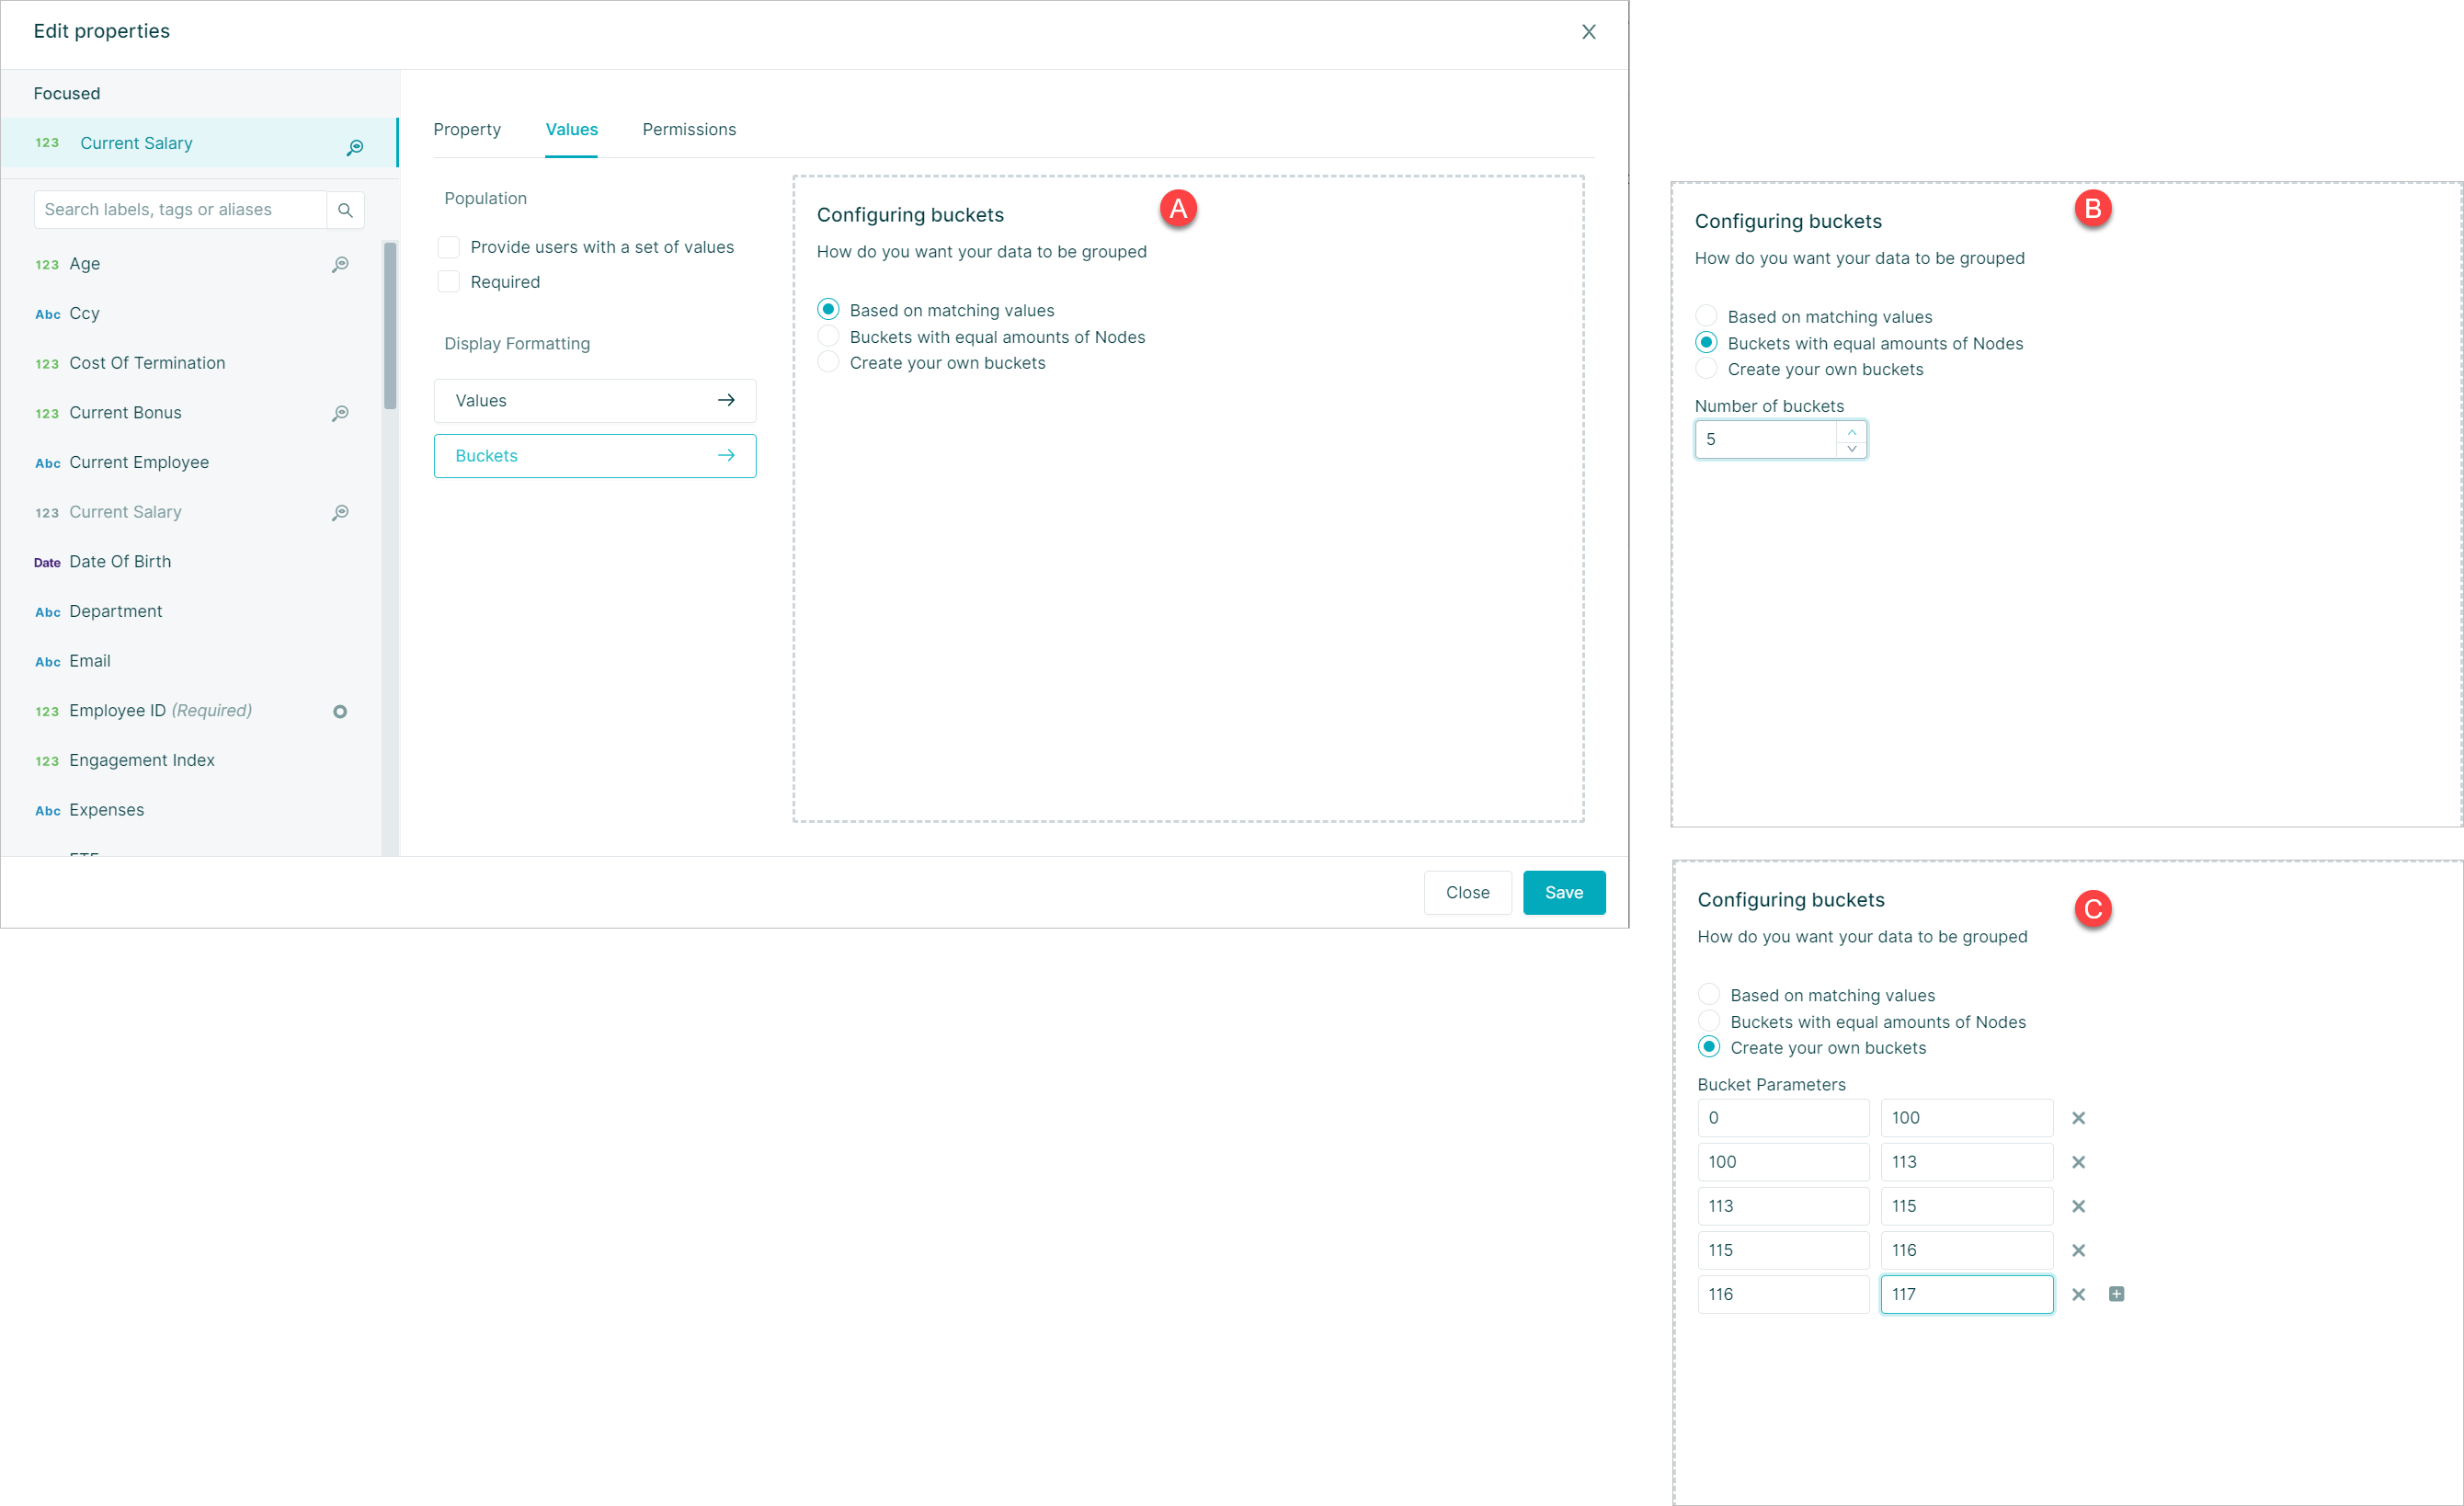
Choose from
- A. Based on matching values
- B. Buckets with equal amounts of nodes. Select the number of buckets
- C. Create your own buckets. Define buckets parameters
Permissions Tab
The permissions tab allows the setting of what role groups can access this property and how they can interact with it
There are 4 levels of permissions that may be applied to properties
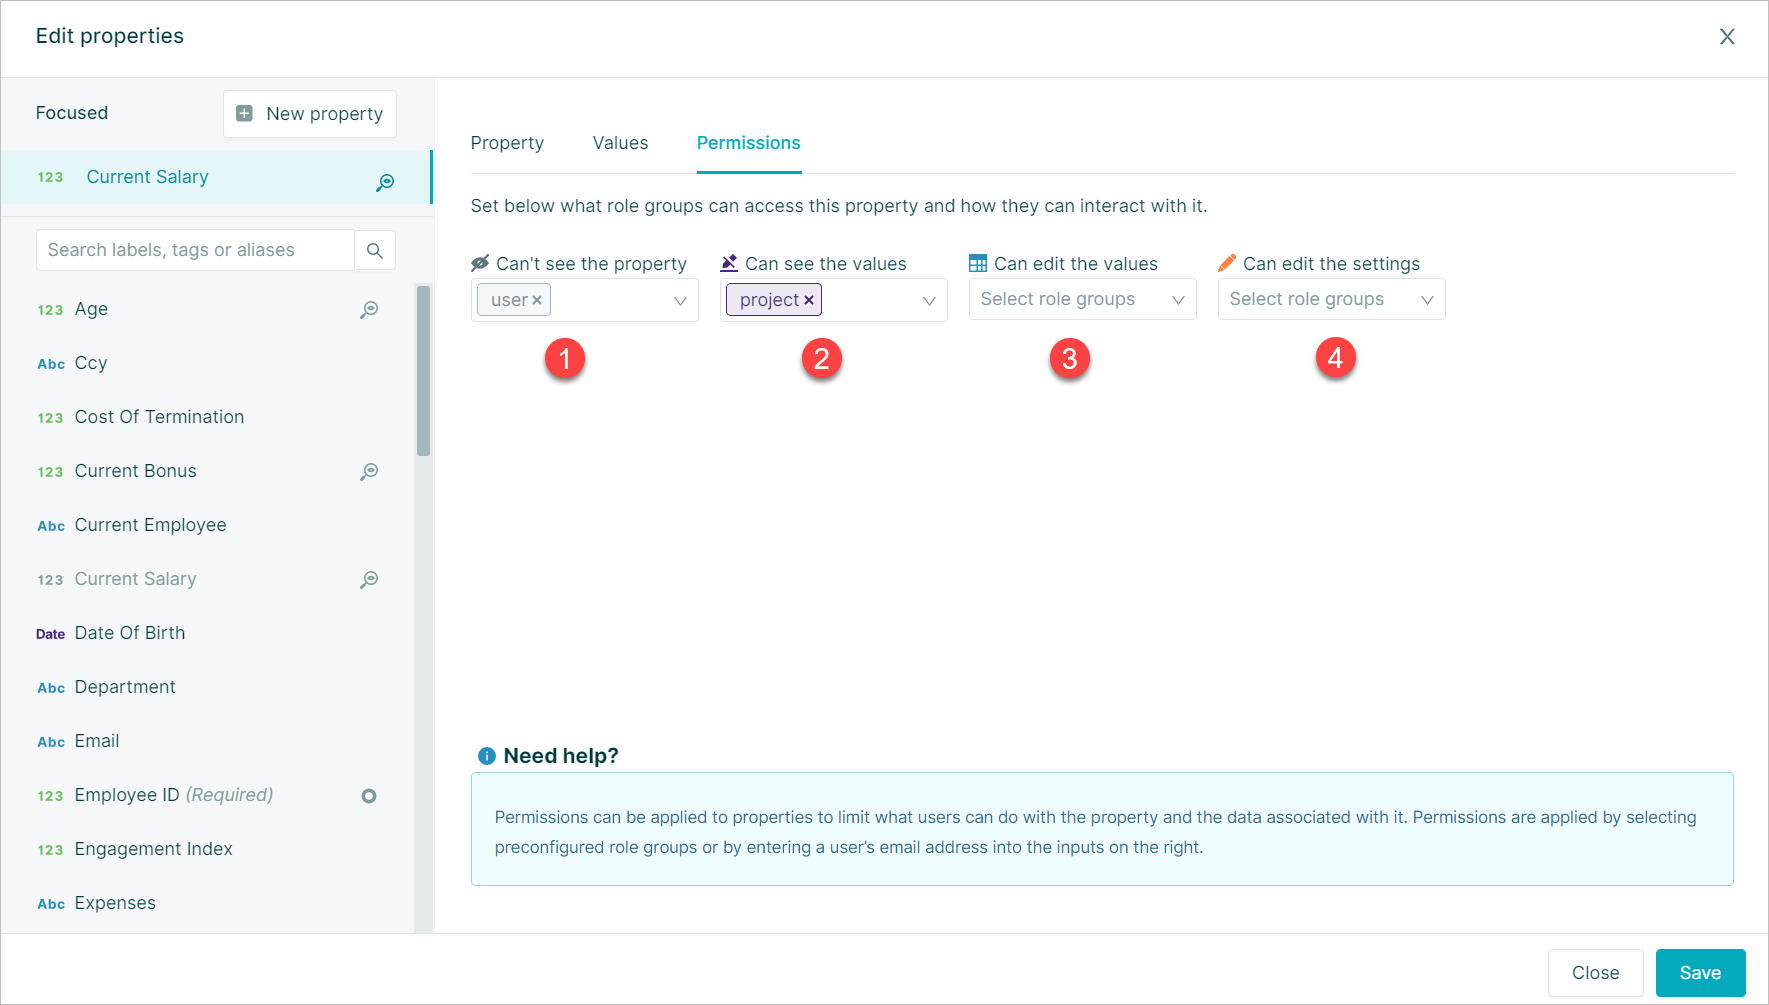
- Hidden: Cant see the property
- Read Only: Can see the values
- Update: Can edit the values
- Modify: Can edit the settings
Permissions are applied by entering a role group into the permission level box
See in the Settings User Guide for more details
Duplicate Property
It is possible to duplicate another Property within your dataset and this may often be easier than adding a Property, if formats & details are similar
Existing properties may be duplicated by selecting the Duplicate icon for the required property on the Property Manager
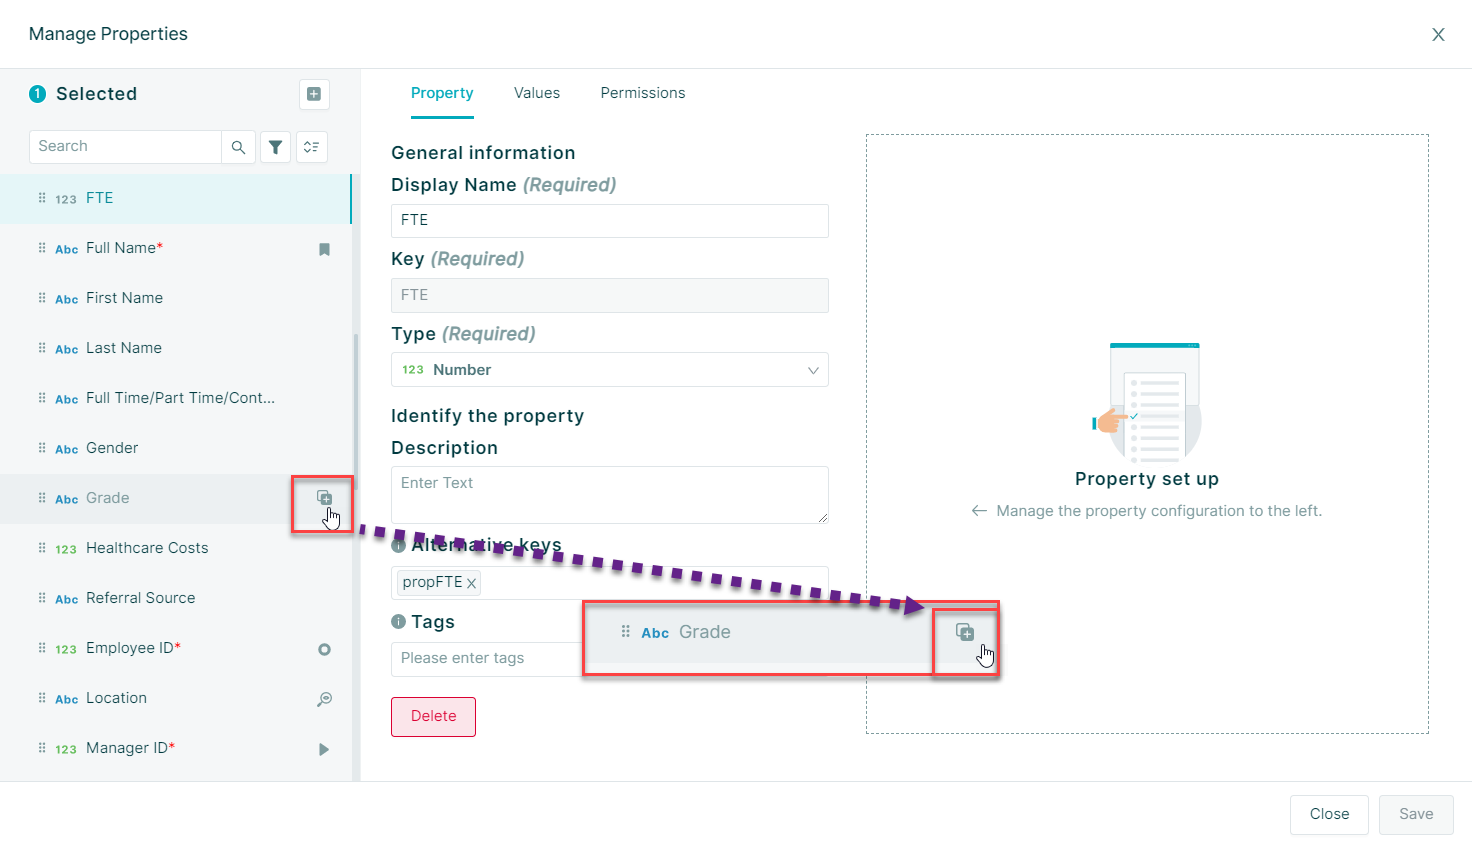
This will open the edit details side panel for the duplicated Property where you can enter or edit the following details:
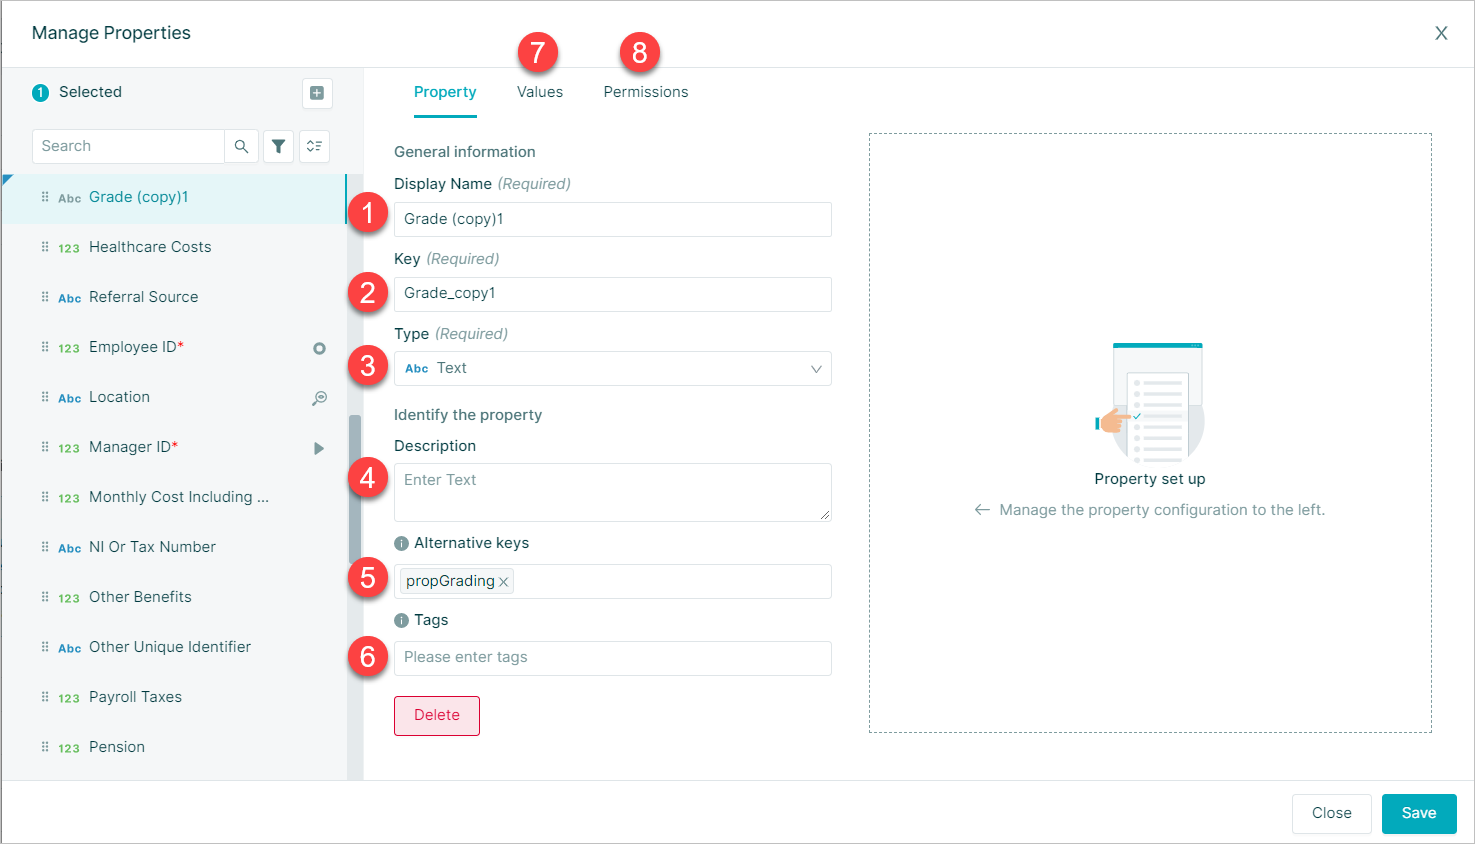
- Display Name: This will default to
Duplicated Property name - (copy)1but can be amended - Key will default to
Duplicated Property name_copy1but can be amended - Property Type
- Description
- Alternative Keys
- Property tags
- Values
- Permissions Tab
Delete Property
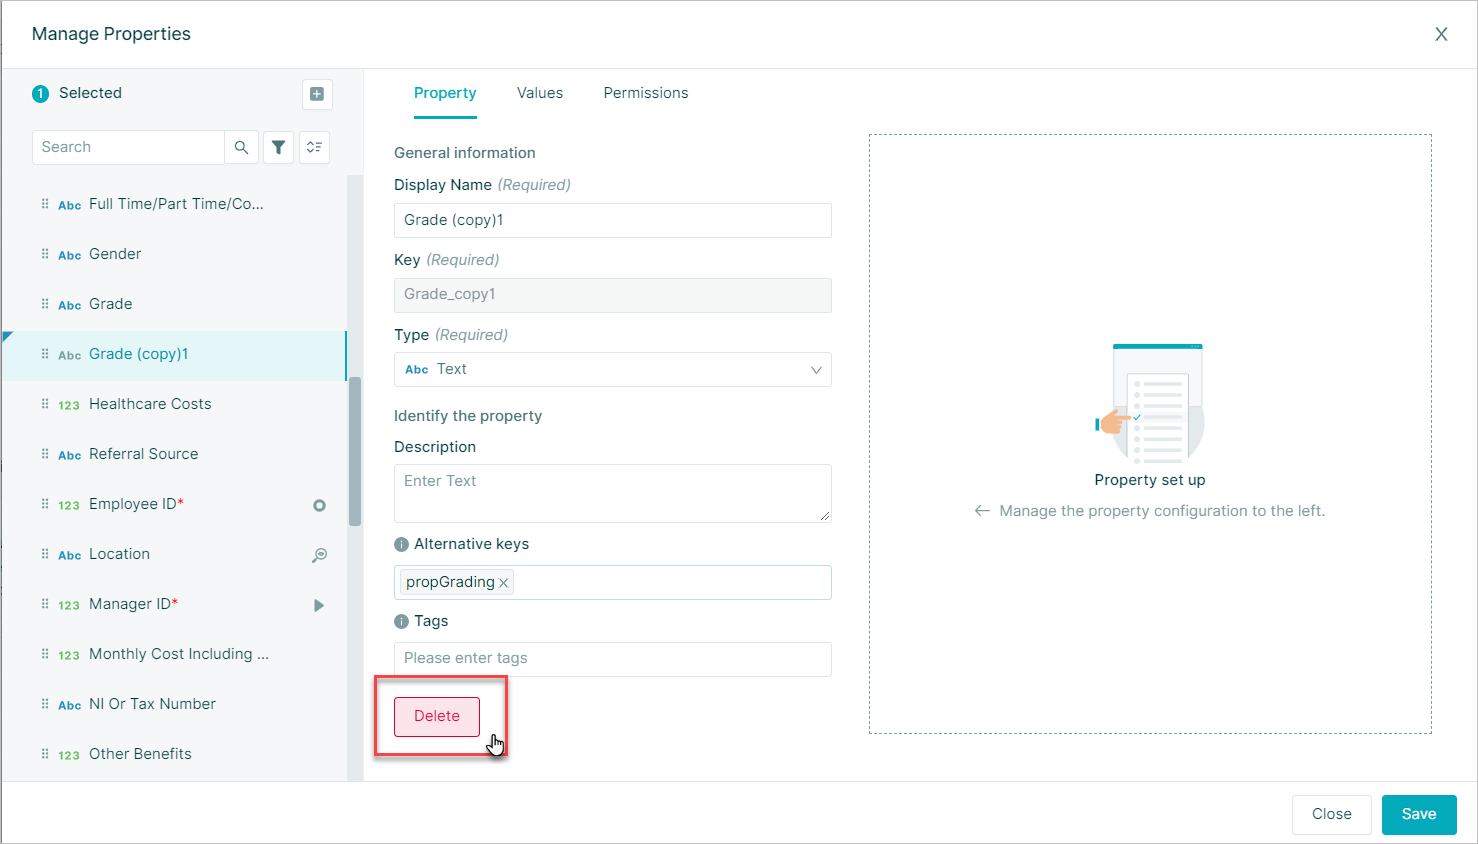
To delete a Property select the Delete button for the required property on the Property Manager
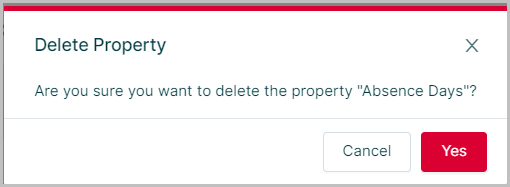
Confirm that you wish to delete the Property by selecting Yes on the confirmation message that is displayed
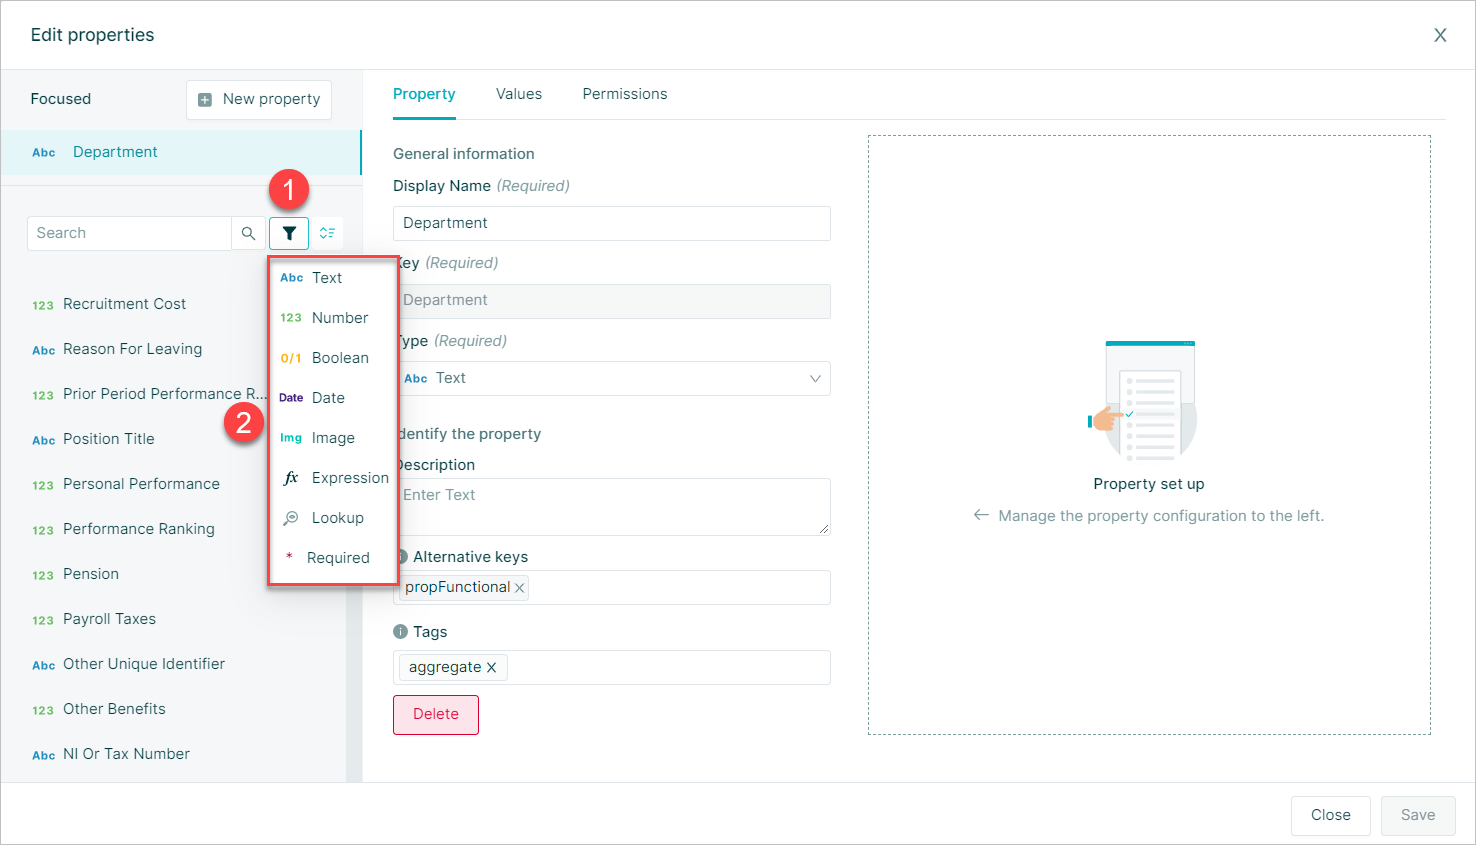
Filter Properties
When using the Property Manager it is possible to filter the displayed properties by:
- Selecting the
Filtericon - Selecting the category to apply the filter to the property list displayed
Select from:
- Text
- Number
- Boolean
- Date
- Image
- Expression
- Lookup
- Required
Sort Properties
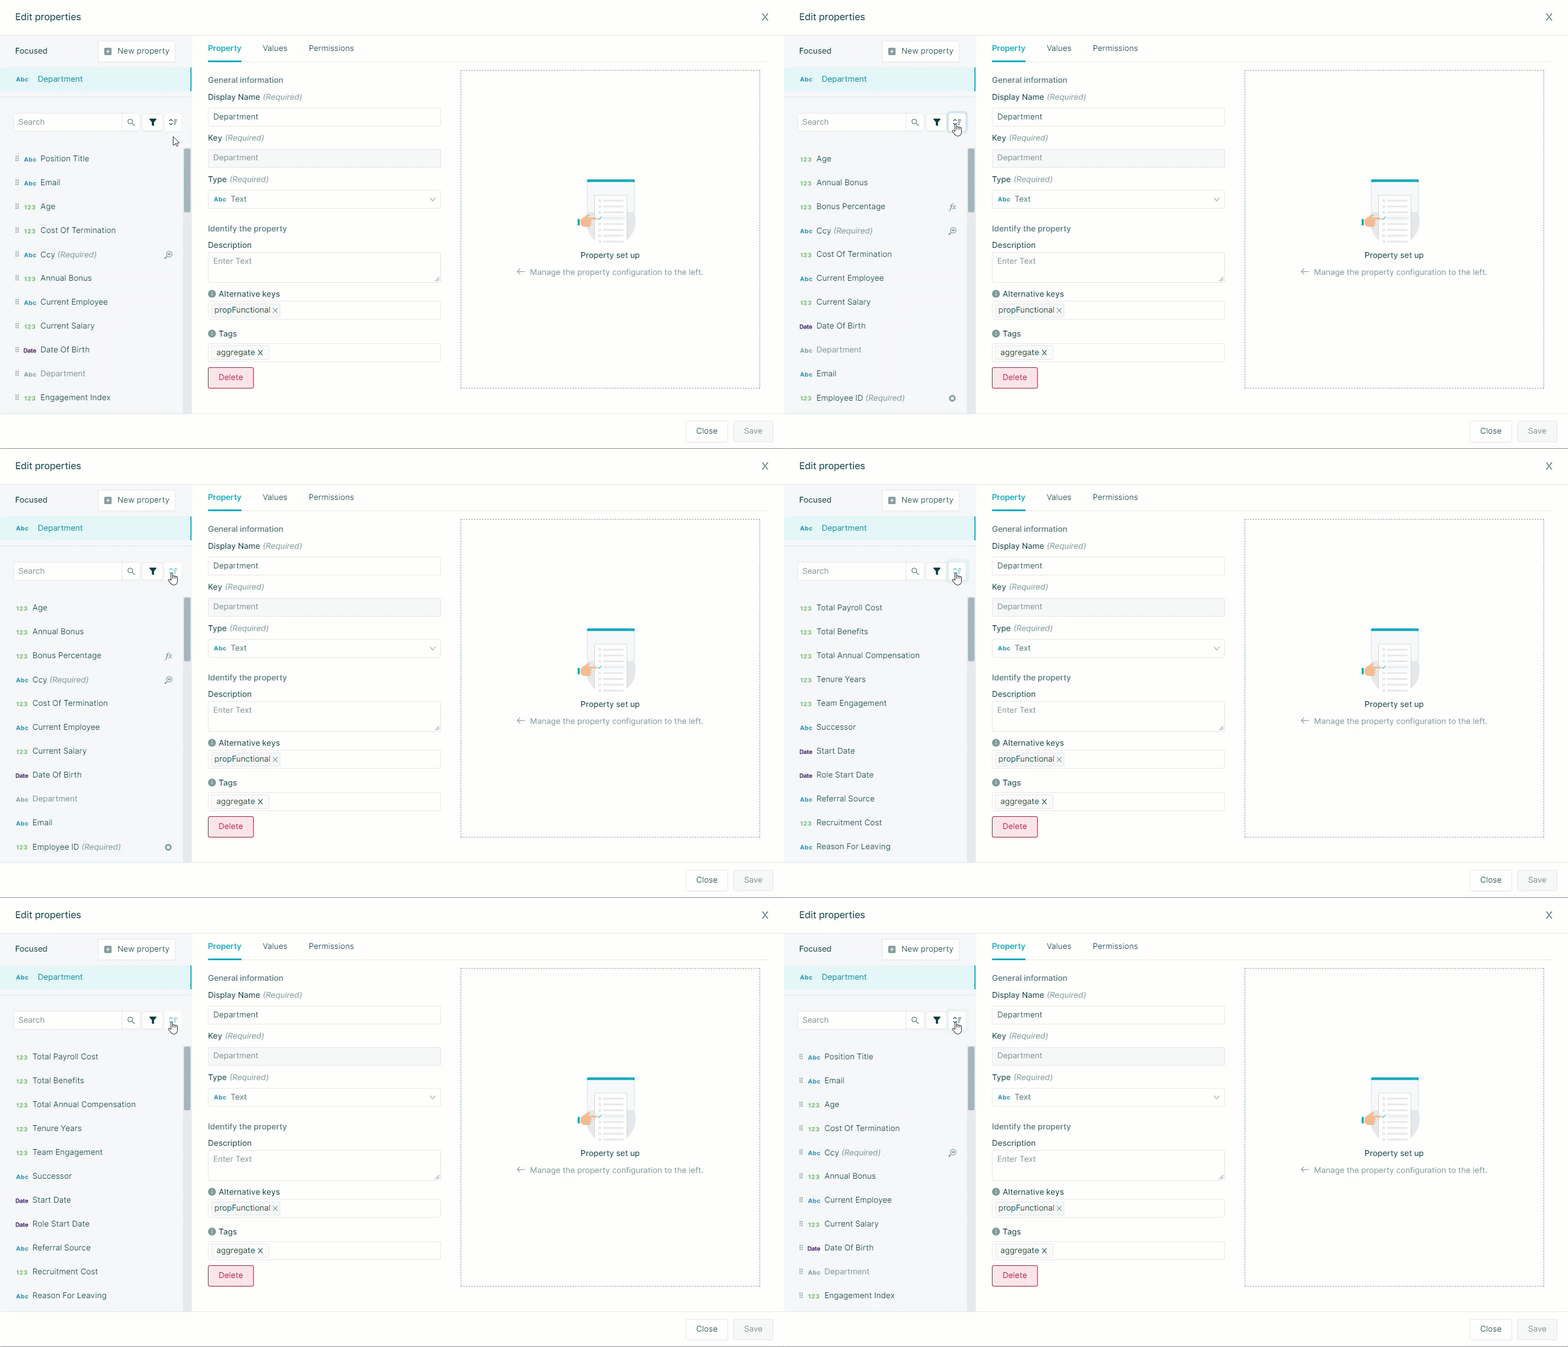
Properties within the Property Manager window can be sorted using the Sort button
Selecting the Sort button will cycle through the available sort options
Default > A-Z > Z-A > Default
Reorder Properties
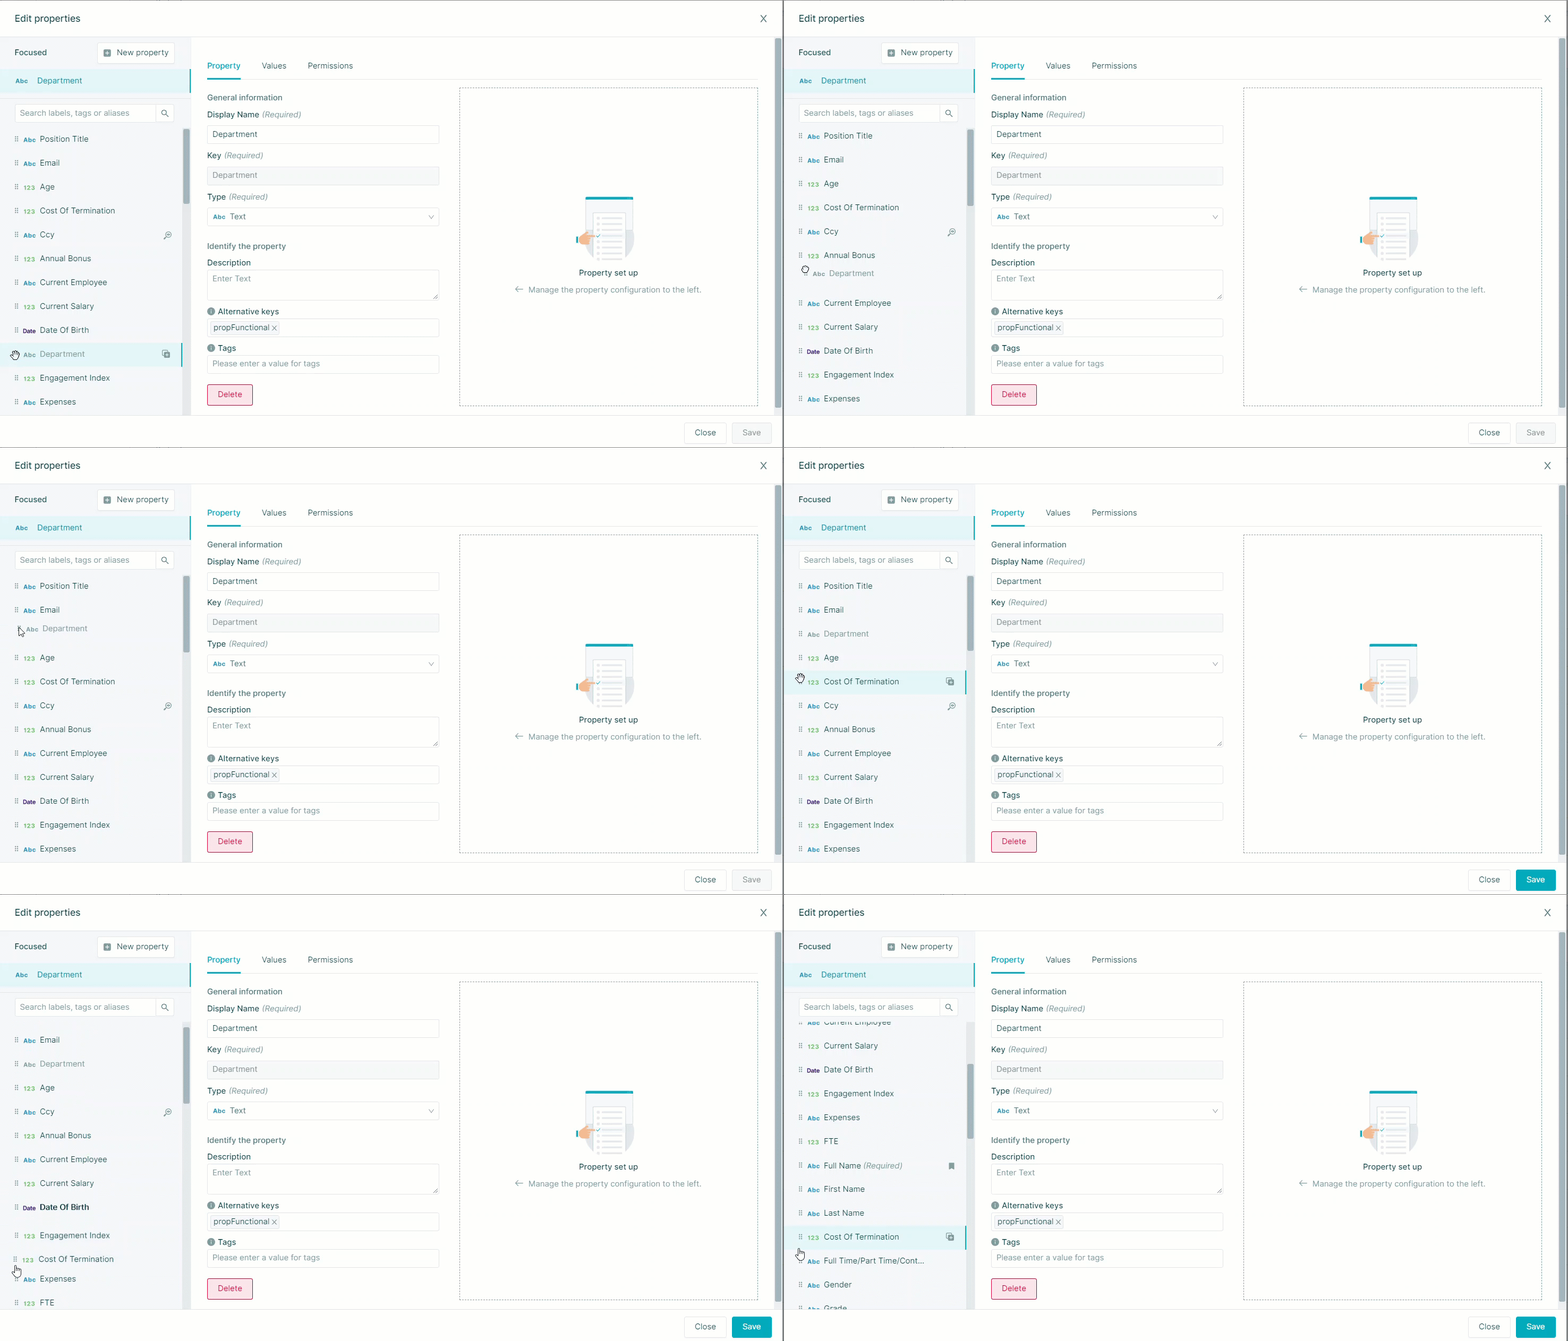
Properties will appear on the Property Manager screen in the order that they appeared on the source file
If you have expression properties in your dataset they will calculate in the order they appear in the Property Manager
The Property order will also be reflected when adding a node or downloading a dataset
To change the order of properties use the 6 dots icon to drag and drop the properties to the desired Property order
Search Properties
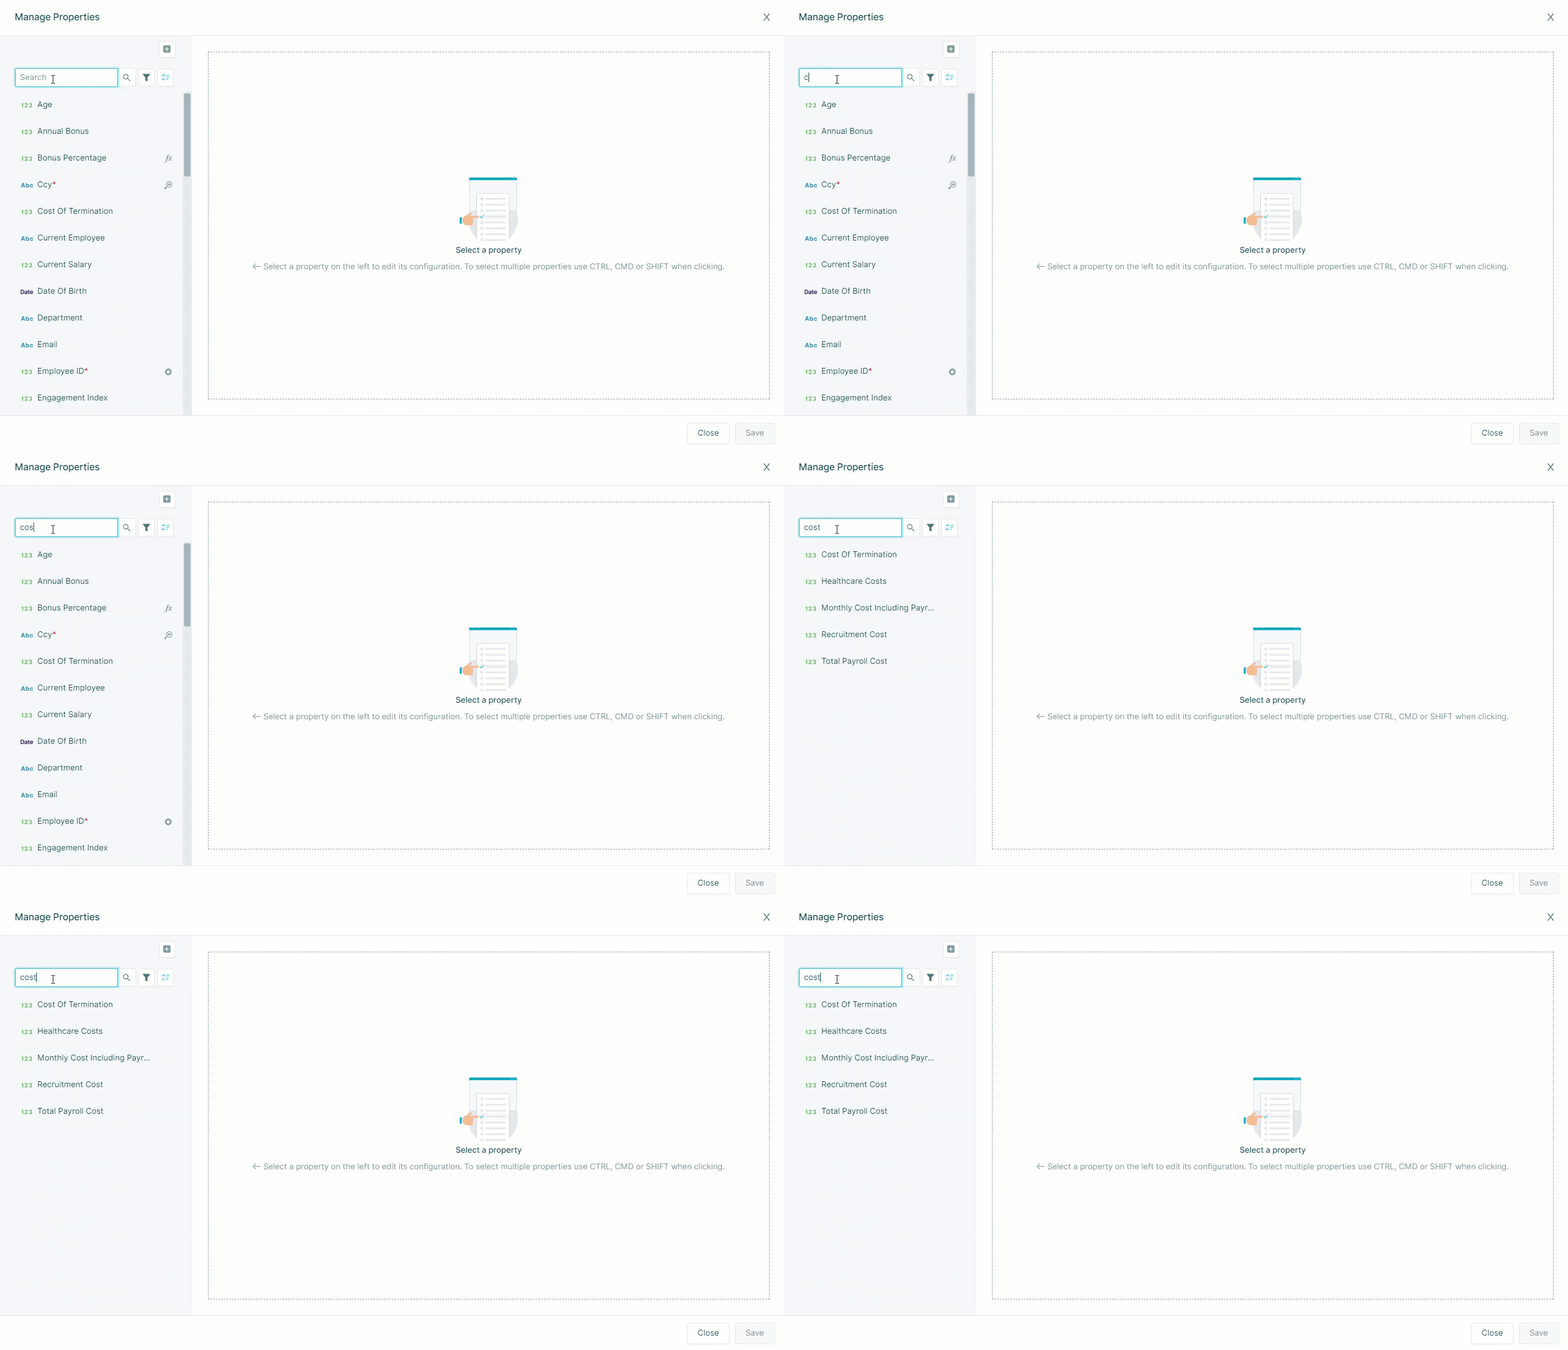
Properties may be searched for by entering the string into the search box
Properties matching the search string will be displayed as the search is entered
Expression Properties
When adding new properties or editing existing properties, it is possible to include expressions to create calculated properties to populate values
This may range from simple mathematical calculations that add two properties together to provide a sum, through to more complex logic based transformations of data
Expressions in Orgvue are written in Gizmo. It is a scripting language that has its roots in JavaScript but has been added to and modified by the Orgvue development team
For further detail on Gizmo expressions see the
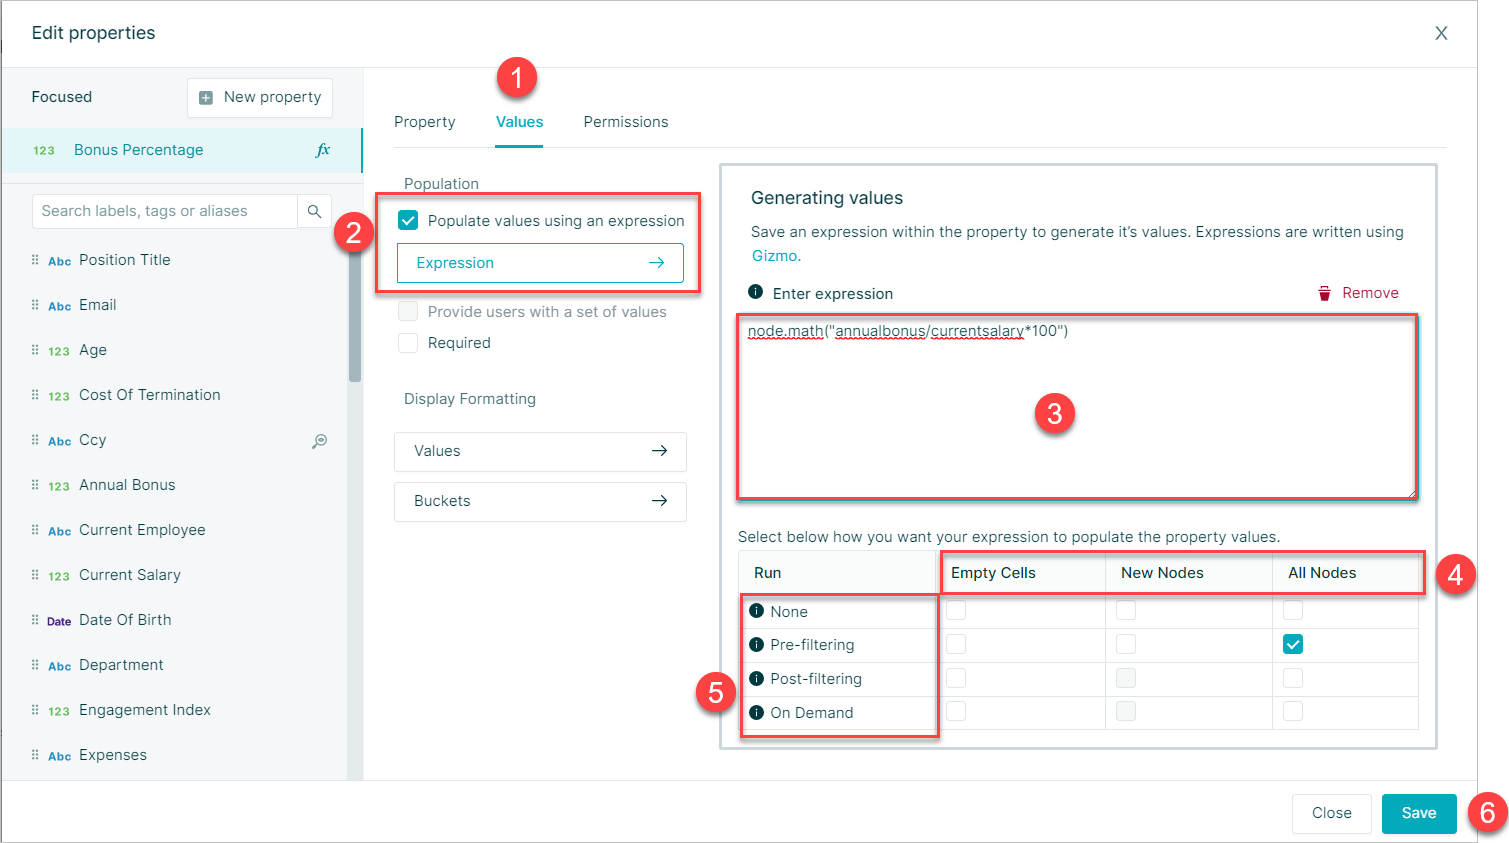
To populate property values using an expression, first follow the steps to either Add a New Property or Edit an existing property
- Select the Values Tab
- Select the
Populate values using an expressioncheckbox - Enter the Gizmo Expression into the expression window
- Select the required Property expression mode
- Select the required Property evaluation mode
- Select
Save
Property Expression Mode
The expression mode determines when a Gizmo expression will be run for the property value for a node
| Expression Mode | Behavior |
|---|---|
| Empty Cells | If the cell has no value, populate the data with the value returned from the expression |
| New Nodes | When a new node is created, populate the cell with the value returned by the expression The expression will only run on the creation of a node |
| All Nodes | The expression will be evaluated for all Nodes, regardless of whether a Cell stores a value of not. The Cells are not editable within Workspace |
Property Evaluation Mode
The Evaluation mode determines how the expression will work
| Evaluation Mode | Behavior |
|---|---|
| None | The Expression will be treated as a literal value, returned as it is entered in the Expression box |
| Pre-filter | The expression will ignore any Filtering or Paging that is applied. The expression will be re-evaluated whenever data are edited |
| Post-filter | The expression results depend on any active Filters and evaluation occurs whenever data are edited or when the Filter is changed You cannot Filter or Page on a Post-Filter (or Hierarchy) evaluated Property |
| On Demand | The expression will be evaluated when you activate it in Workspace, and not automatically following edits The return value of the expression will be saved to the Cell. An On Demand expression is always evaluated Pre filter |
Expression and Evaluation mode relationship
The selection made for Expression and Evaluation modes work together to provide different outcomes
This table describes the relationship between the various options
| Expression Mode | |||
|---|---|---|---|
| Evaluation Mode | Empty Cells | New Nodes | All Nodes |
| None | The value will be interpreted as a literal, printed to populate the property's cell if that cell does not otherwise carry a value. The default value is not persisted on save | The value will be interpreted as a literal, populating the property's cell if no other value was presented at creation time. The value is persisted on save | The expression will be printed to populate the property's cells, regardless of whether the cell carries a persisted value or not |
| Pre-filter | The expression will be run before the data is filtered for a visualization and this will populate the property's cells | The expression will be run on node creation, independently of filtering, and the return value will populate the property's cell. The output will be saved after the expression is run in the dataset | The expression will be run before the data is filtered for a visualization and this will populate the property's cells |
| Post-filter | The expression will be run after the data is filtered for a visualization and this will populate the property's cells | NA (evaluation of New Nodes value is always pre-filter) | The expression will be run after the data is filtered for a visualization and this will populate the property's cells |
| On Demand | The expression will be run after the data is filtered for a visualization and this will populate the property's cells. The values will be saved to the dataset after the expression is run. Will only populate blank values in the property | NA (evaluation of New Nodes value is always pre-filter) | The expression will be run when manually triggered with evaluation done pre filter and this will populate the property's cells. The values will be saved to the dataset after the expression is run Will be applied to all property values regardless of whether they are already populated or not |
Lookup Properties
New or existing properties may be linked to lookup datasets that have either:
- A. Loaded into your tenant with the dataset type set to Lookup
- B. Tagged
lookupon the screen
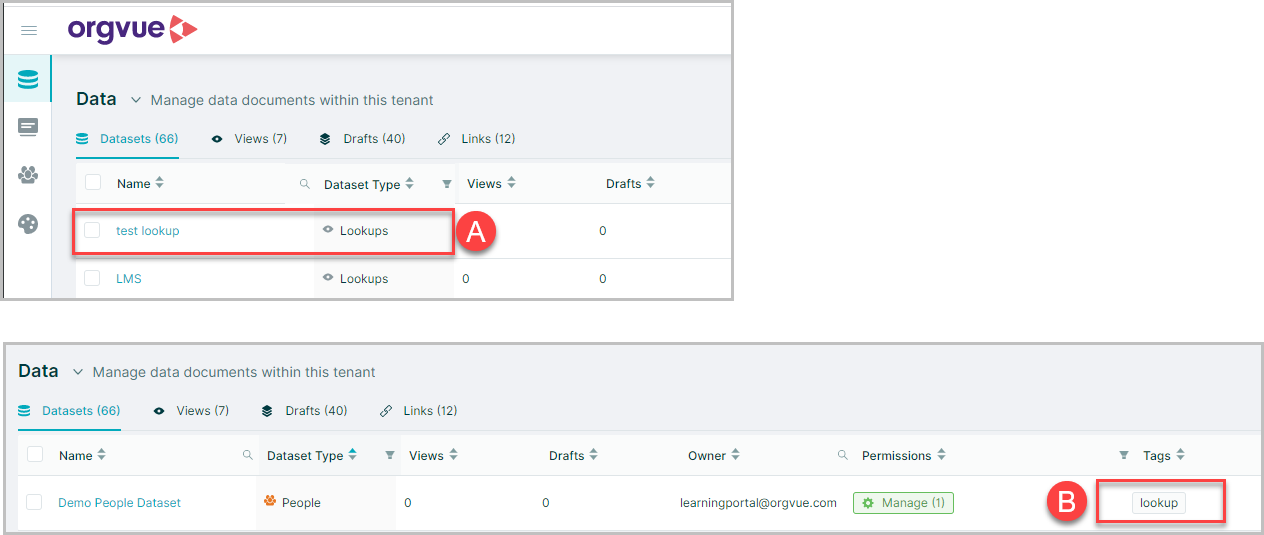
Lookups allow you to reference a central source of data that may change on a regular basis without having to change all the datasets using the lookup data
A common example would be an exchange rate table to provide currency conversion rates to all salaries entered in local currency, based on the currency Property
If a new Property is being added to link to a lookup, follow the steps in Add Property to complete the mandatory fields on the General tab first
To set a Property to reference a lookup table:
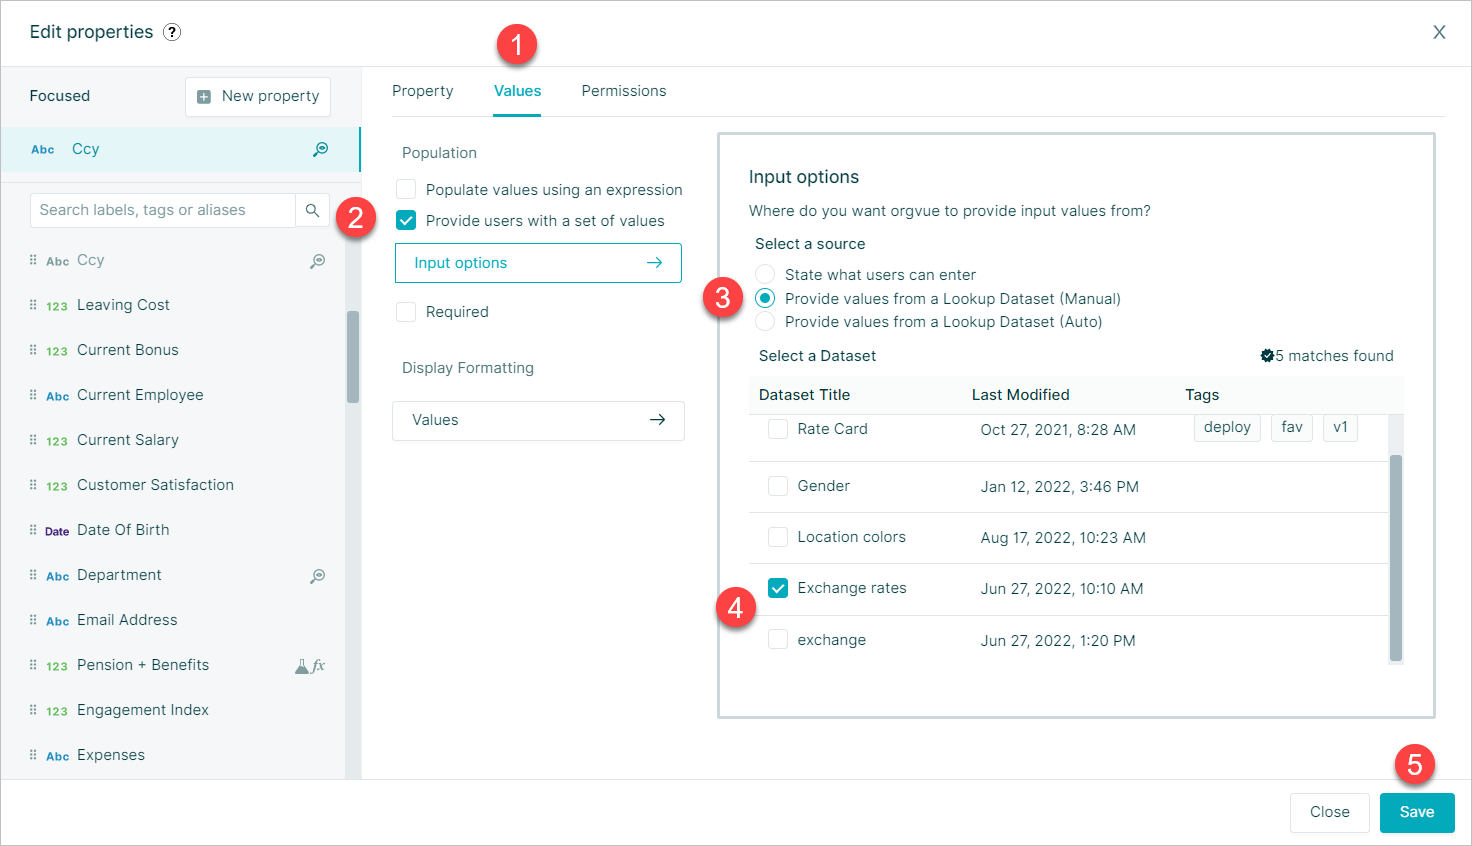
- Select the
Valuestab on the Property Manager - Then select
Provide users with a list of set valuescheckbox - Select
Provide values from a Lookup Dataset (Manual)checkbox - Select required dataset from list
- Select
Saveto complete the Lookup
The properties in the lookup dataset will then be available in workspace for use in gizmo expressions and will appear in Property selection panels in the format Property:lookup Property
To view a video showing how to upload a lookup table click the thumbnail to open the video in a new browser tab
See also Dependant Lookups for details of lookup tables that can be used to present options in dropdowns dependant on related properties
Auto Lookup Properties
If the Lookup dataset has been saved with the same name as the property being looked up from then it is also possible to use the Lookup Dataset (Auto) option by
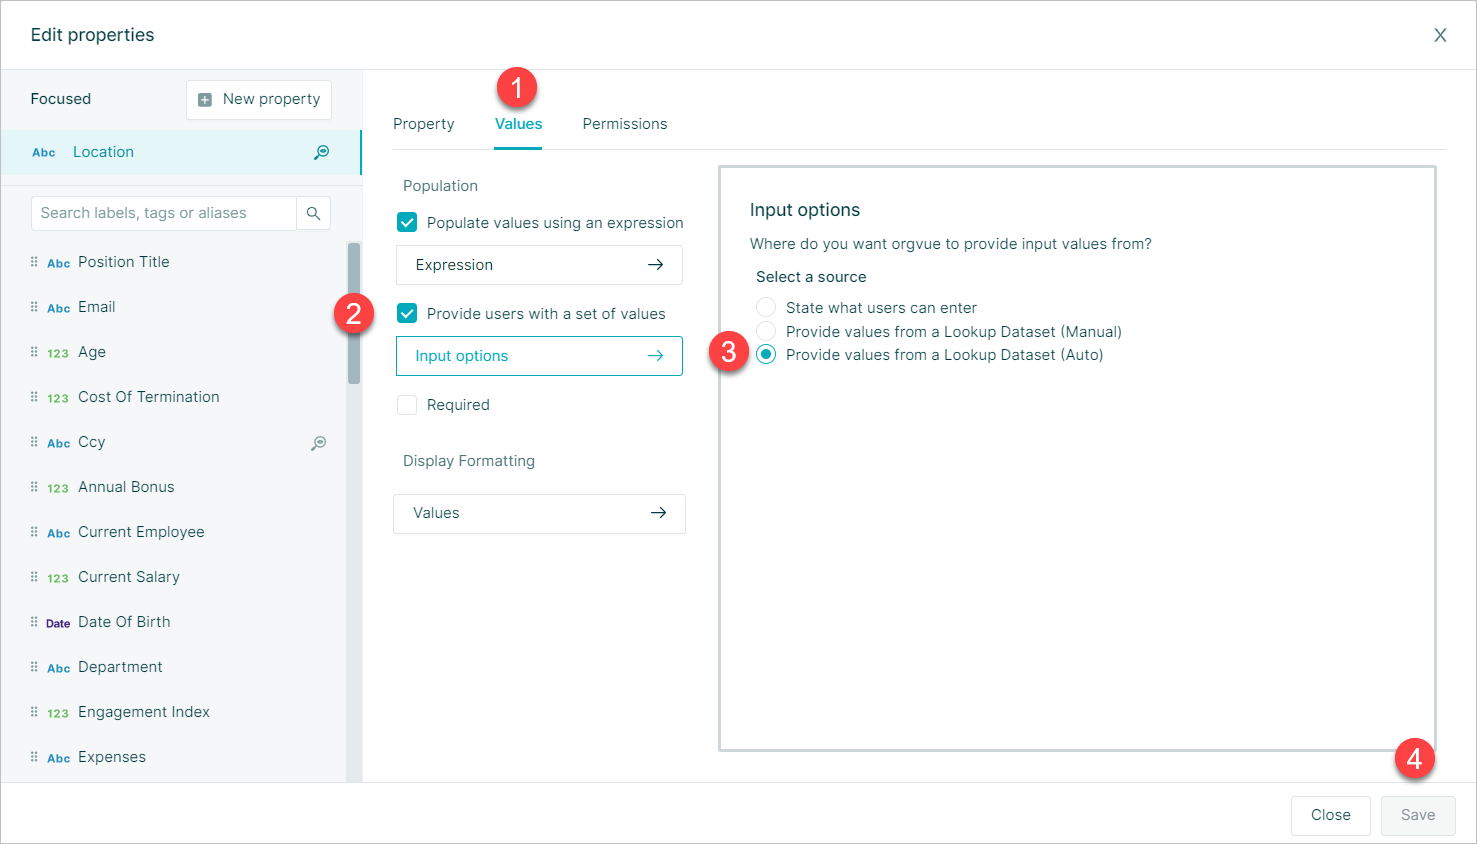
- Select the
Valuestab on the Property Manager - Then select
Provide users with a list of set valuescheckbox - Select
Provide values from a Lookup Dataset (Auto)checkbox - Select
Saveto complete the Lookup
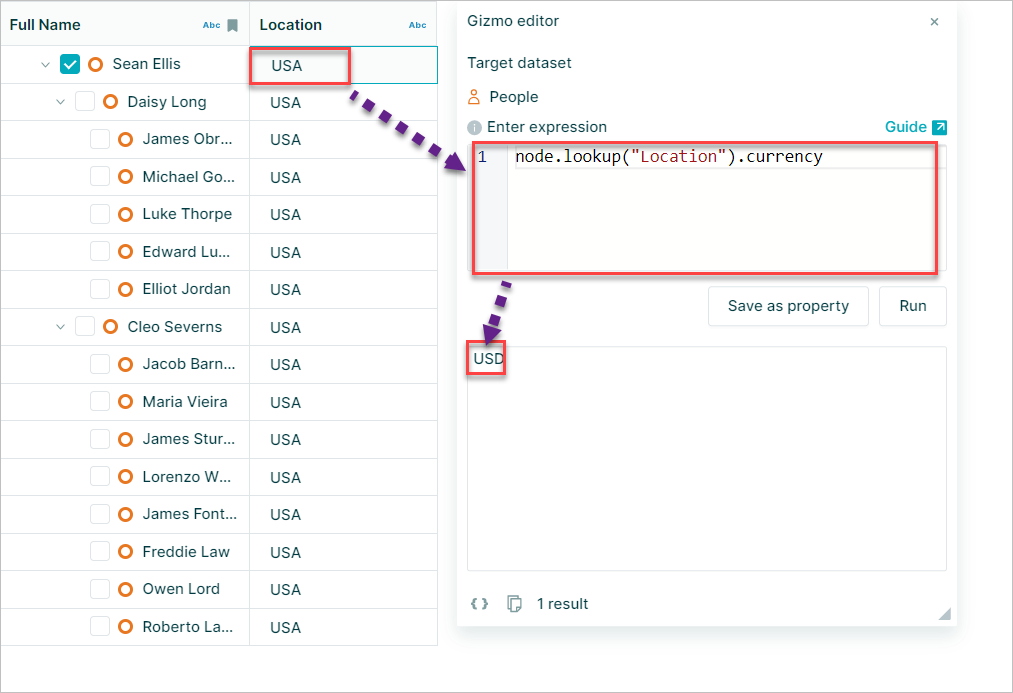
Using this option will not populate the properties from lookup dataset into workspace, but they may still be referenced via using the syntax
node.lookup("lookupproperty").lookedup-property
e.g.
node.lookup("location").currency
Expression Lookups
An expression lookup allows you to define what options are available when updating a Text Property value by providing users with a set of values
This may be useful to limit inputs to a Property value to ensure data cleanliness
An example of this may be to limit the locations available to select, to only London, New York & Paris
This can be done for existing or new properties
To apply an expression lookup to a new Property first follow the steps in Add Property
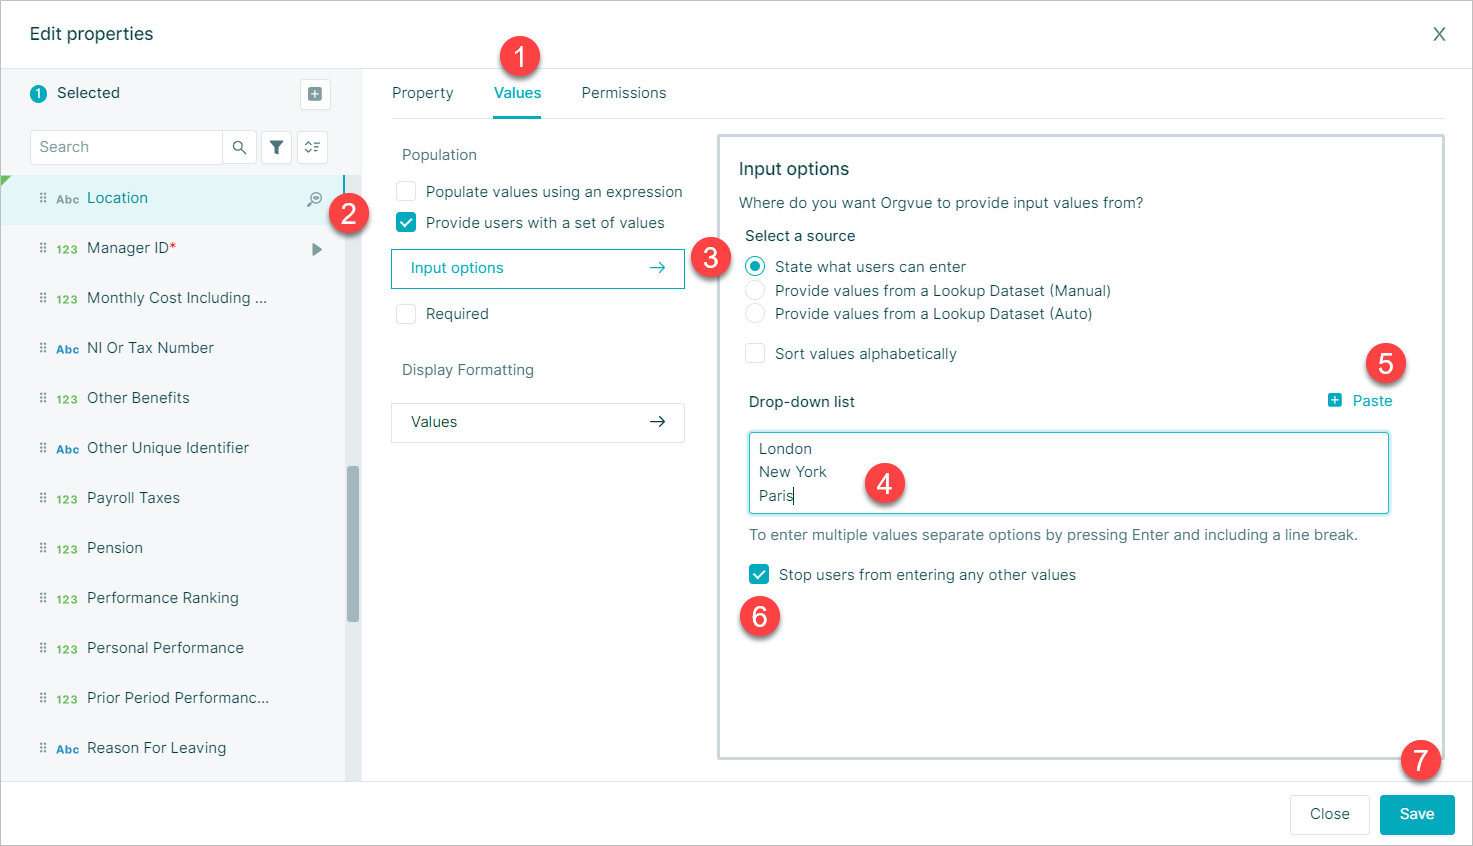
For new, or existing properties:
- Select the
Valuestab on the Edit Property window - Then select
Provide users with a list of set valuescheckbox - Select
State what users can entercheckbox - The list of permitted values should be entered into the
Drop-down listbox and pressingEnterfor each option to include a line break - If required this list of values may be pasted from the clipboard using the
Pasteoption - The
Stop users from entering any other valuescheckbox is used if only the options in the Drop-down list are permitted for entry If the checkbox is not selected then the lookup values will be available in the dropdown to select from, but other values may be entered too - Select
Saveto complete the Lookup
Note: The order in which values are entered into the expression will also define their order as Property buckets in any visualizations
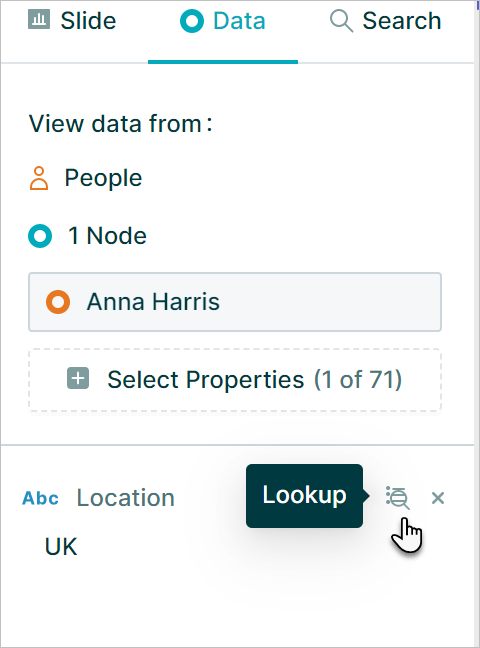
Any Property with a lookup expression will show the lookup icon on the data panel when selected