Async Import Integration
This recipe shows you how to refresh your Orgvue dataset from a source system using the async import endpoint.
When the import runs, Orgvue will:
- Add new records from your source data
- Update existing records with new values
- Delete any records not present in the uploaded data
How async import works
Async import runs in 2 stages. Your data is first uploaded to a temporary file location. Orgvue then imports from that location to update your dataset.
Prerequisites to integrating
- Access to an Orgvue tenant
- Access tokens are enabled for the account used to authenticate API requests
- Dataset created in Orgvue
- All properties pre-configured in the dataset
- Obtain your Base URL, via tenant listing page, & Dataset ID via or the "List datasets" endpoint
- Generate an API token
You can find more advanced details and options in our API documentation
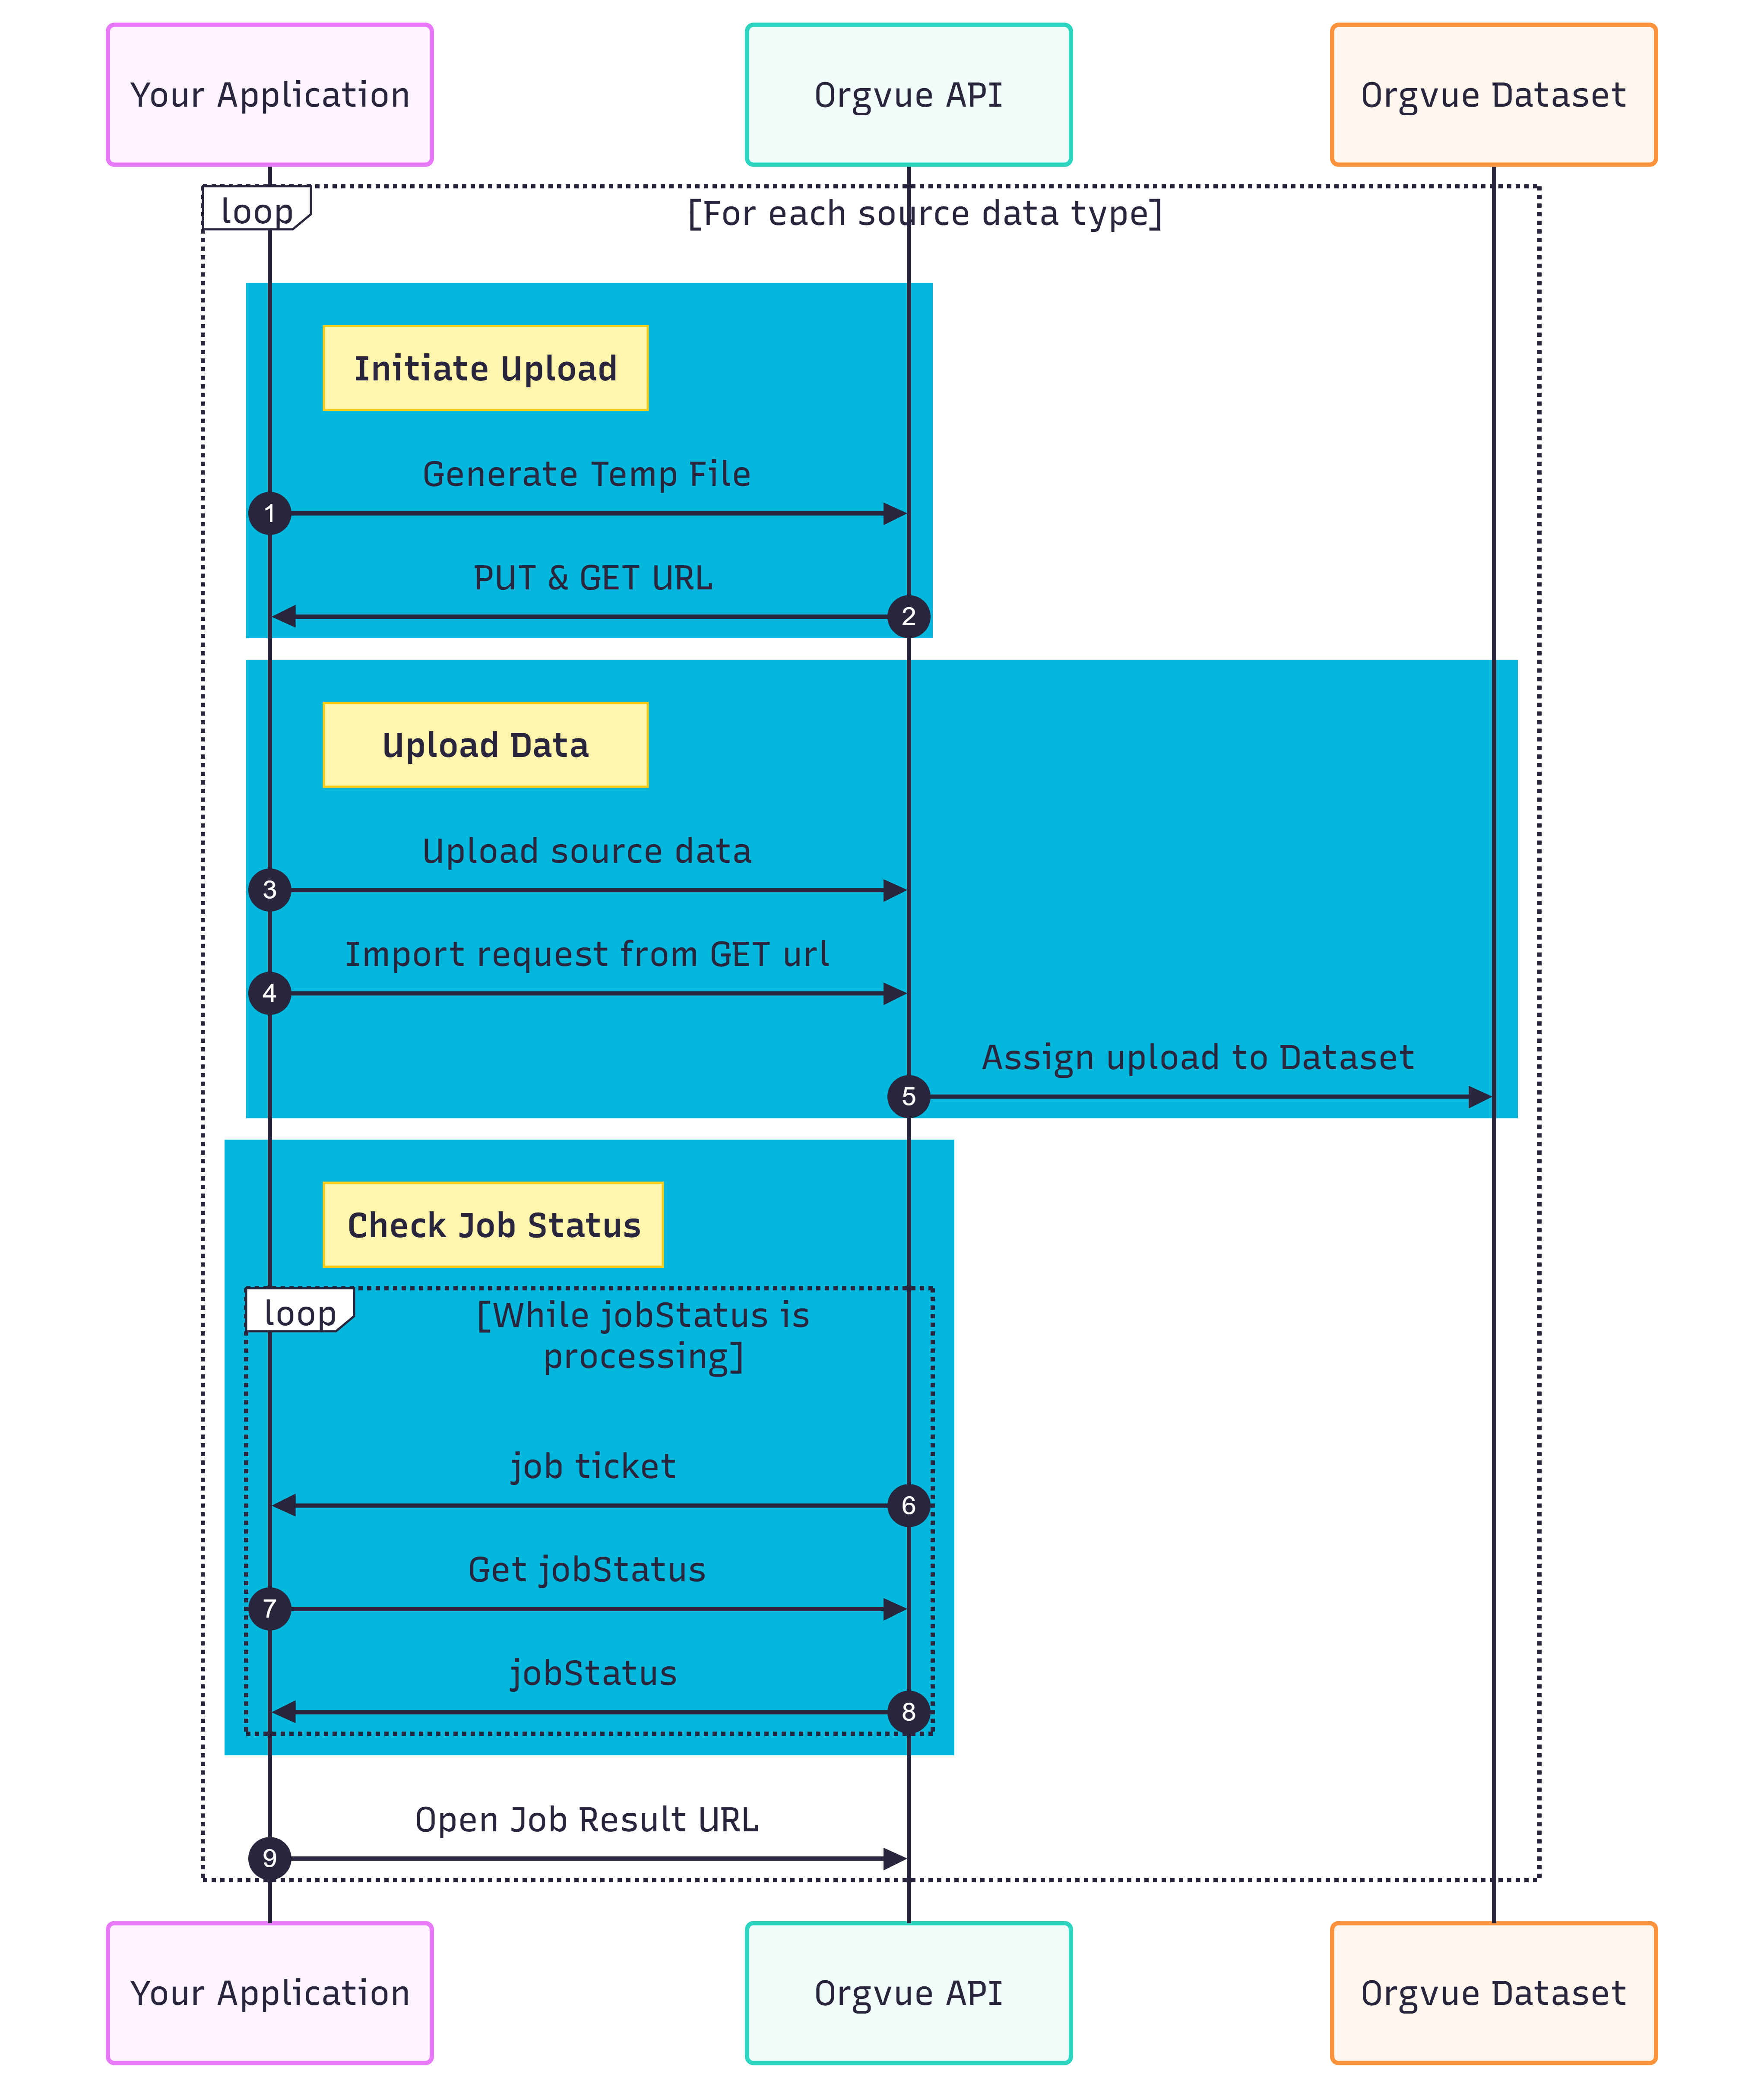
Flow Diagram
The recipe is split into 3 sections:
- Initiate upload — Create a temporary storage location for your data
- Upload data — Upload your data and apply it to your dataset
- Check job status — Use the job ticket to track progress and download the results
Initiate Upload
In this step, you'll create a temporary storage location for your data. You'll also receive 2 URLs that are used in the steps that follow.
1. Generate a Secure File with Temporary Access
Headers:
Content Type: application/json; charset=UTF-8
Authorization: Bearer {APIToken}
Method: POST
https://{baseUrl}/api/v1/{tenantId}/files/generate
To use the temporary file location, you first need to generate it.
This returns 2 URLs:
A GET URL — to read from the location
A PUT URL — to write to the location
Data written to the location is encrypted at rest and automatically deleted after a set period.
The JSON payload for the request uses the following format:
{
  "targetType": "json",
  "targetEncoding": "identity"
}
If the imported file is CSV format then the targetType should be set to csv instead
2. GET and PUT URL
The response to the request will be a pair of URLs for use with the PUT and GET command
{
    "get": "https://orgvue.eu-west-1.concentra.io/api/canon/v1/temporaryStore?token={temporaryReadAccessToken}",
    "put": "https://orgvue.eu-west-1.concentra.io/api/canon/v1/temporaryStore?token={temporaryWriteAccessToken}"
}
For more detail on working with temporary files see Security and working with temporary files
Upload Data
In this next step, you'll upload your updated data to the temporary storage location, then trigger the import to apply it to your dataset.
3. Source data
Your source data must include all nodes and property values — this is a full dataset refresh, not a partial update.
Any nodes in your Orgvue dataset that don't appear in the uploaded data will be deleted.
Make sure your source file is complete before uploading to avoid data loss.
4. Upload Data to the PUT URL
Upload data to the PUT URL from step 2 via
Headers:
Content Type: application/json; charset=UTF-8
Method: PUT
https://orgvue.eu-west-1.concentra.io/api/canon/v1/temporaryStore?token={temporaryWriteAccessToken}
For full details of the request payload see "Sync import" endpoint
The action createOrUpdate is used for every node in the payload so that any existing node is updated with the uploaded values while any new nodes are also created at the same time
[
  {
    "_action": "createOrUpdate",
    "employeeID": "1453878",
    "fullName": "John Smith",
    "positionTitle": "Software Engineer",
    "grade": "G3",
    "salary": 65000,
    "dob": "1981-05-15",
    "managerID": "5871235",
    "location": "London"
  },
    {
    "_action": "createOrUpdate",
    "employeeID": "1453974",
    "fullName": "Mary Jones",
    "positionTitle": "Consultant",
    "grade": "H7",
    "salary": 67500,
    "dob": "1997-06-01",
    "managerID": "4451276",
    "location": "New York"
  },
    {
    "_action": "createOrUpdate",
    "employeeID": "2178493",
    "fullName": "Rex James",
    "positionTitle": "Graduate Engineer",
    "grade": "C2",
    "salary": 37500,
    "dob": "2002-08-10",
    "managerID": "5871235",
    "location": "Sydney"
  },
]
If uploading the data from as CSV file the payload would be in the following format
_action,employeeID,fullName,positionTitle,grade,salary,dob,managerID,location
createOrUpdate,1453878,John Smith,Software Engineer,G3,65000,1981-05-15,5871235,London
createOrUpdate,1453974,Mary Jones,Consultant,H7,67500,1997-06-01,4451276,New York
createOrUpdate,2178493,Rex James,Graduate Engineer,C2,37500,2002-08-10,5871235,Sydney
5. Import data from Temporary file to Dataset
Import data via:
Header:
Content Type: application/json; charset=UTF-8
Authorization: Bearer {APIToken}
Method: PUT
https://{baseUrl}/api/v1/{tenantId}/datasets/{datasetId}/items/import?implicitDelete=true&autoId=true
Include the following query parameters in your request:
implicitDelete=true — Deletes any nodes from your dataset that don't appear in the uploaded file.
autoId=true — Enables upload using the dataset's auto ID property (for example, employeeID).
In the request body, specify the import location using the GET URL from step 2
You can also include the following optional parameters:
Result Location URL — Specify an alternative URL for the result status to be posted to. If none is provided, results are posted to the original PUT URL.
The JSON payload for the import has the following format
{
  "importLocation": {
    "method": "GET",
    "url": "https://orgvue.eu-west-1.concentra.io/api/canon/v1/temporaryStore?token={temporaryReadAccessToken}"
  },
  "resultLocation": {
    "method": "PUT",
    "url": "https://orgvue.eu-west-1.concentra.io/api/canon/v1/temporaryStore?token={temporaryWriteAccessToken}"
  },
}
6. Upload is assigned to dataset
The uploaded file is assigned to the dataset
Check Job Status
Finally, use the job ticket returned by your upload to check the import status and download the final result — a summary of every action applied during the import.
7. Job Ticket created
The response from Step 5 will include the job ticket URL
{
    "_links": {
        "self": {
            "url": "https://url-signing-ads-serverless-qa-2-vanilla.s3.eu-west-1.amazonaws.com/DIGITAL_LEARNING-6319e4ce-f091-4f74-9e1c-a606b1eb47f7token={temporaryAccessToken}",
            "contentType": "application/json; charset=UTF-8",
            "type": "jobTicket"
        }
    },
    "jobStatus": "created",
    "_createdAt": "2026-06-02T10:01:25.579Z",
    "_createdBy": "rob.purbrick@orgvue.com",
    "X-Amzn-Trace-Id": "Root=1-6a1ea9ef-211def316ab5a8dfff5eb7a2"
}
8. Poll job status
Poll the _links.self.url endpoint regularly until the job status is completed
9. Job status completed
Completed job status response example
{
  "_links": {
    "self": {
      "url": "https://url-signing-ads-serverless-qa-2-vanilla.s3.eu-west-1.amazonaws.com/DIGITAL_LEARNING-370e041c-0070-4136-b683-2a642086a67e?Token={temporaryAccessToken}",
      "contentType": "application/json; charset=UTF-8",
      "type": "jobTicket"
    },
    "result": {
      "contentType": "application/json; charset=UTF-8",
      "type": "downloadLink",
      "url": "https://orgvue-qa.eu-west-1.concentra.io/api/canon/v1/temporaryStore?token={temporaryAccessToken}"
    }
  },
  "jobStatus": "completed",
  "_createdAt": "2026-06-04T14:30:47.294Z",
  "_createdBy": "rob.purbrick@orgvue.com",
  "X-Amzn-Trace-Id": "Root=1-6a218c15-39c24230b5fc1513b481e425",
  "_modifiedAt": "2026-06-04T14:30:57.371Z"
}
10. Download the job result
The job status will include a result url in the format: "https://{baseUrl}/api/canon/v1/temporaryStore?token={temporaryAccessToken}"
This url will then provide the result of the imported data, including errors for any failed jobs and the upload summary for successfully completed jobs
[
  {
    "_status": "skipped",
    "_id": "83EDA1EC-CE54-0AB4-41E4-10696FE1192F",
    "_action": "update",
    "employeeID": 1453878
  },
  {
    "_status": "skipped",
    "_id": "83EDA1EC-3B88-2914-A62D-EBEB403D10B9",
    "_action": "update",
    "employeeID": 1453974
  },
  {
    "employeeID": 2178493,
    "_id": "83EDA1EC-961A-A7E6-324F-922CA1F38282",
    "_action": "delete",
    "_status": "implicitDelete"
  }
]
See API documentation for further details on Query Parameters
Async Import Postman Collection
We also provide a Postman collection for Async Import.
You will need to setup the postman collection's variables tab before before any of the requests can be run:
- set the bearerToken variable to your generated API token
- set baseUrl to the base URL on which you created your API token e.g. https://orgvue.eu-west-1.concentra.io
- set tenantId to the name of your tenant
- set datasetId to the unique dataset id of your dataset
You can now run the first request 'Generate temporary file'. This will create a temporary file and provide you with two links:
- a PUT link, which you will use to upload the item updates you wish to import
- a GET link, which you will use to import these item updates to the dataset
After running this request, you will need to copy and paste the generated PUT link to the URL section of the second request 'Upload data to temporary file'. The body of this request should contain the item updates you wish to upload.
Once the second request has been sent, you will need to copy and paste the generated GET link to the 'url' field of the 'importLocation' object in the request body of the third request 'Import data into Orgvue'. Once this final request is sent, your item updates will have been imported into your Orgvue dataset.