Export dataset via asynchronous request
This recipe shows you how to export your data from an Orgvue dataset in your chosen format via the Async export endpoint
When the export endpoint runs Orgvue will
- Execute any on Demand expressions specified
- Apply any filtering or projections
- Export the data in your required format to a secure temporary file store
- Return a job status URL the client can poll to track export provisioning progress
- Once the export is ready, provide a download URL to retrieve the data
In this example recipe we will be exporting in csv, applying filtering on the Department property and projections to restrict the data exported
How Async Export works
Async export runs in two stages, your export is uploaded to a secure temporary file location and you then download it from there
Prerequisites to integrating
- Access to an Orgvue tenant
- Access tokens are enabled for the account used to authenticate API requests
- Dataset created in Orgvue
- All properties pre-configured in the dataset
- Obtain your Base URL, via tenant listing page, & Dataset ID via or the "List datasets" endpoint
- Generate an API token
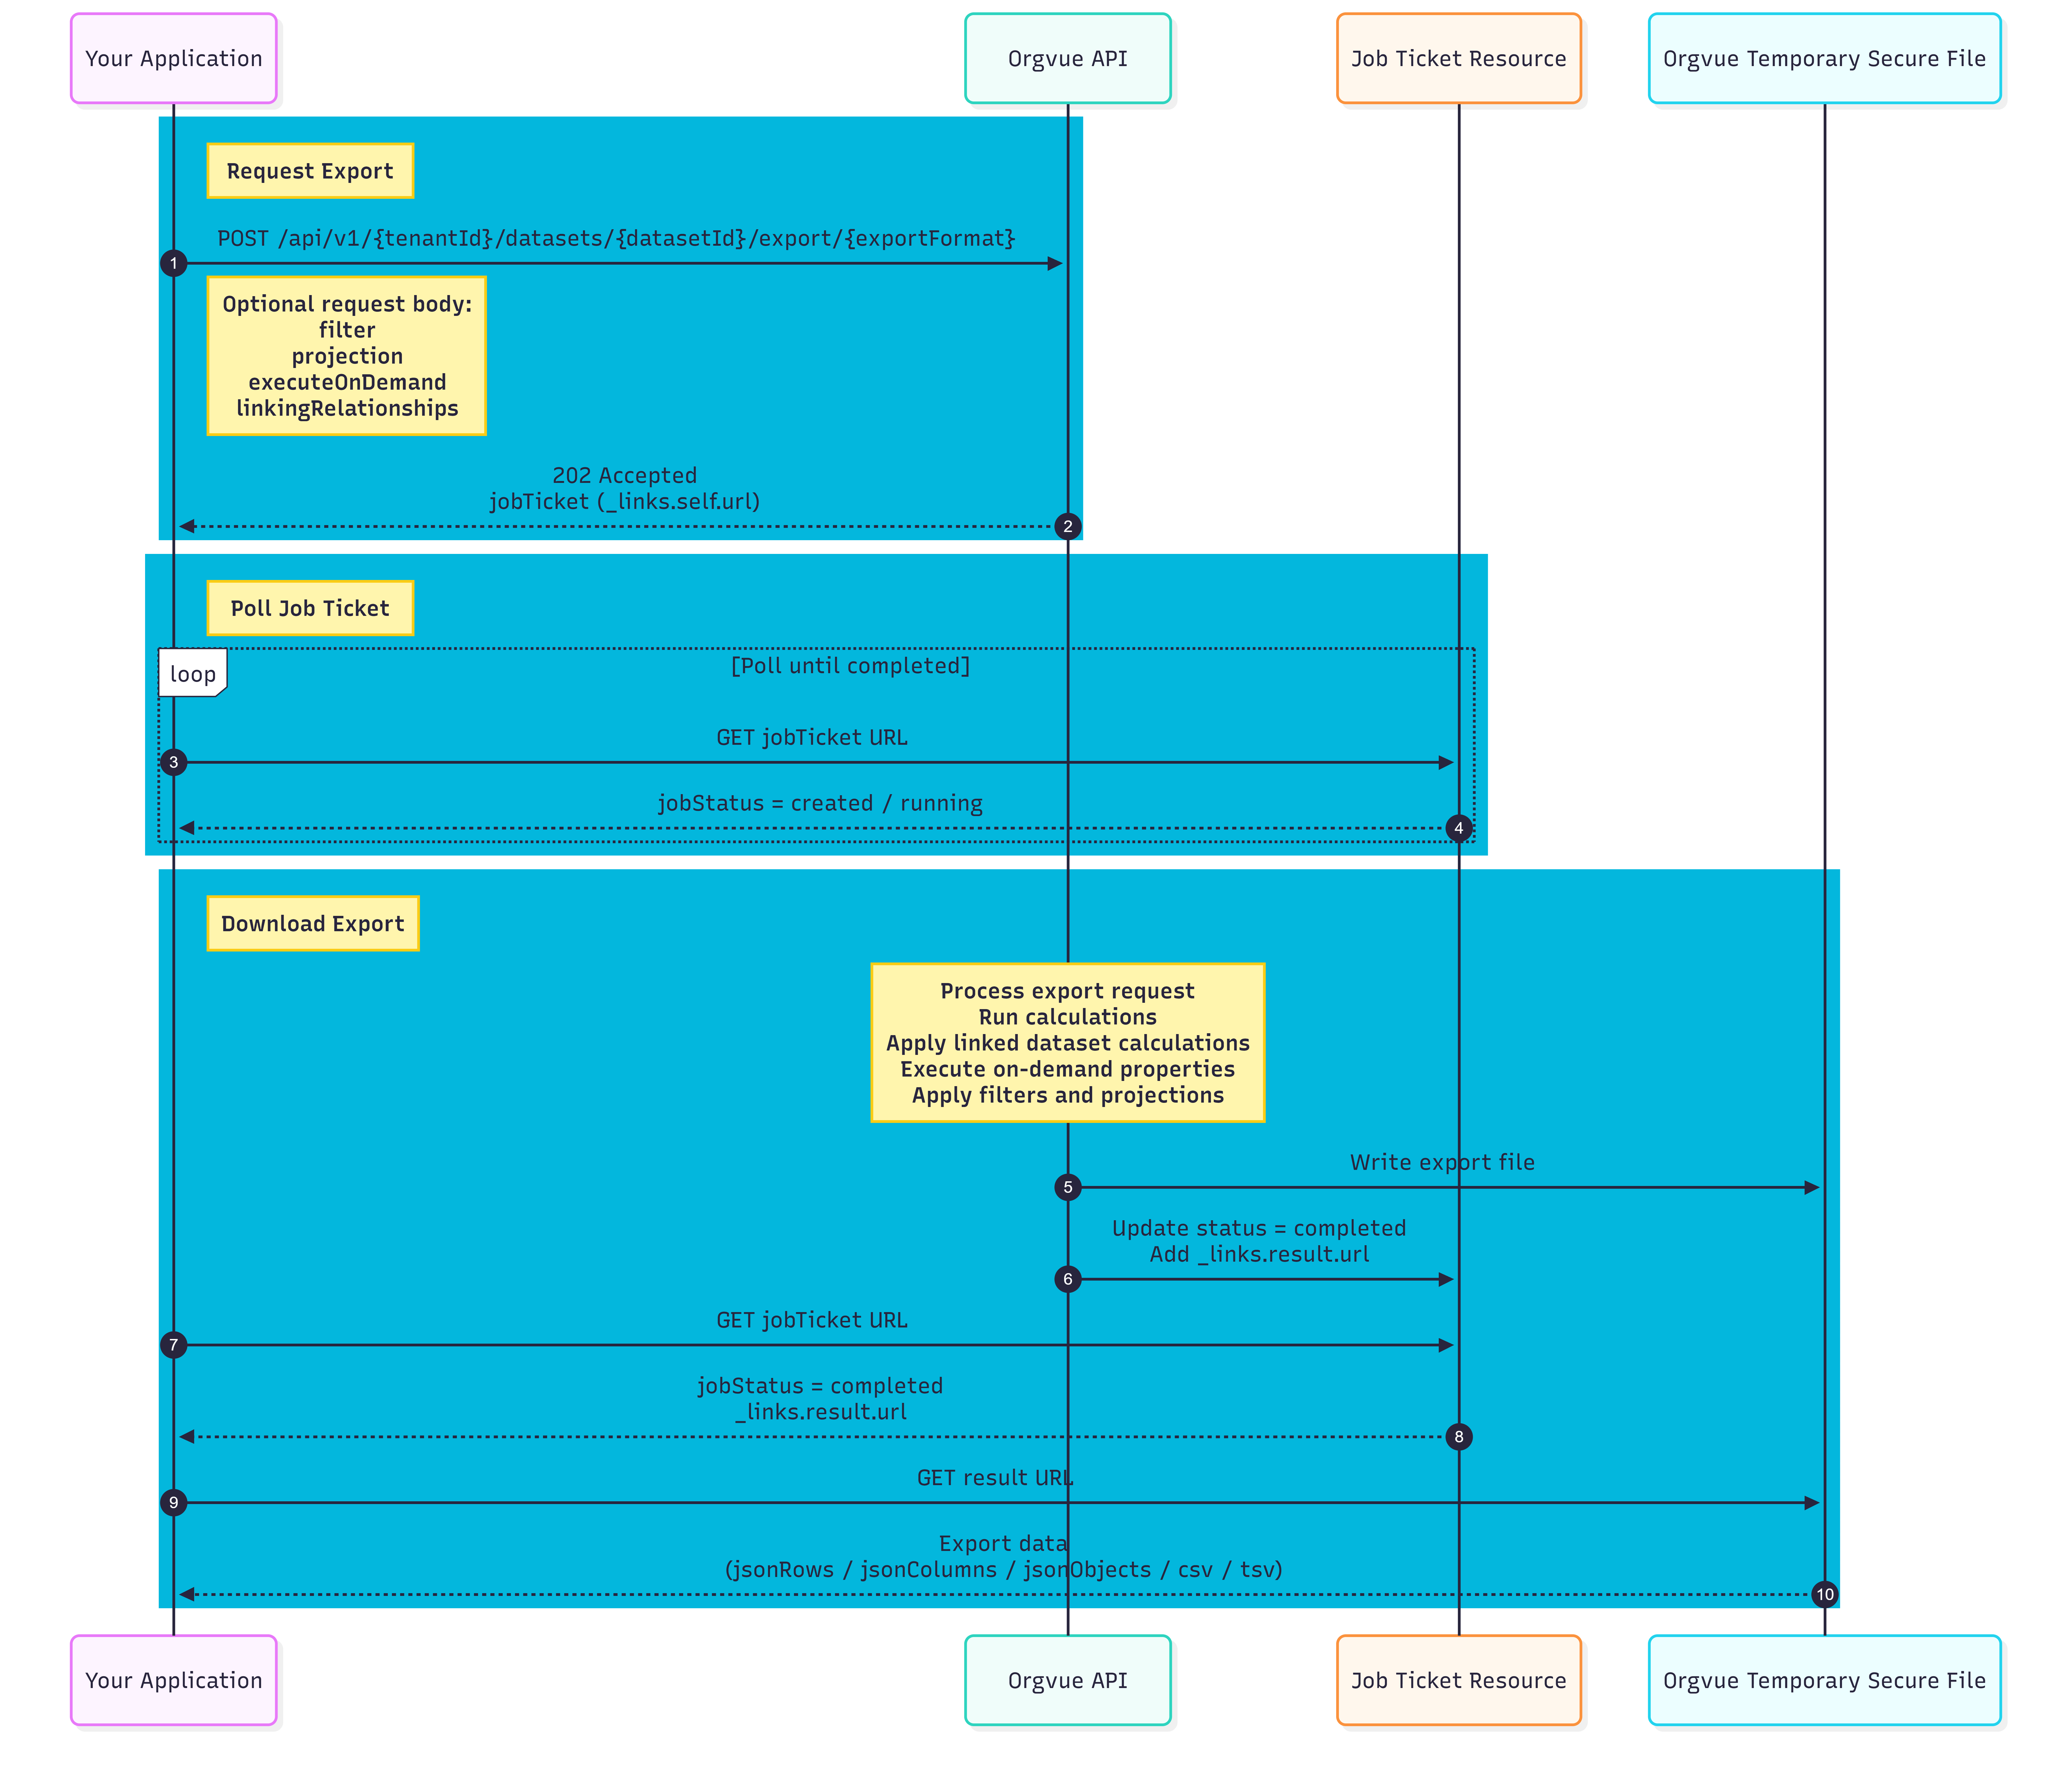
Flowchart
The recipe is split into 3 sections:
- Request Export — Define the format and add any filters or projections to your request
- Poll Job Status — Use the job ticket to track progress of export request
- Download Export — Once job ticket is complete download your file from the secure temp storage file
Request Export
In this first step you need to decide what format you want your export in, choose from csv, tsv, jsonRows, jsonColumns, or jsonObjects If no export format is provided the default jsonRows will be used.
Customize what data is included in your export via the query body where you can:
- Apply row level filtering using MongoDB's query language
- Apply column filtering and sorting using internal projection object and projectionMode
- Include On-demand properties to calculate as part of the export
- A Links datasetId may be supplied in the
linkingRelationshipsto allow calculations to be executed with the context of a specific linked dataset.
If "csv" or "tsv" are selected as the export format in a UNIX environment, then the lineEndings="unix" query parameter must be added to ensure correct export with multi line data cells.
Send export POST request
Headers:
Content Type: application/json; charset=UTF-8
Authorization: Bearer {APIToken}
Method: POST
https://{baseUrl}/api/v1/{tenantId}/datasets/{datasetId}/export/{csv}
Body
{
    "query": {
        "output": {
            "filter": {
                "department":{
                    "$in": [
                        "orgvue",
                        "Sales",
                        "Executive"
                    ]
                }
            },
            "projection": {
                "Annual Bonus": 0,
                "Current Salary": 0,
                "Pension": 0,
                "Total annual compensation": 0,
                "Total payroll cost": 0
            },
            "projectionMode": "add"
        }
    }
}
In this example, the query body does two things:
Filters records — only employees in the Orgvue, Sales, and Executive departments are exported.
Sets projectionMode to "add" — all properties are included by default. Any property specified in projection with a value of "0" is excluded from the export.
Job Ticket Response
A successful export request returns 202 Accepted along with a polling URL.
Example response
{
    "_links": {
        "self": {
            "url": "https://url-signing-ads-serverless-qa-2-vanilla.s3.eu-west-1.amazonaws.com/DIGITAL_LEARNING-f23b0a2c-9974-4aca-b7fe-865679ef0e7c?Token={temporaryAccessToken}",
            "contentType": "application/json; charset=UTF-8",
            "type": "jobTicket"
        }
    },
    "jobStatus": "created",
    "_createdAt": "2026-06-17T11:20:03.597Z",
    "_createdBy": "rob.purbrick@orgvue.com",
    "X-Amzn-Trace-Id": "Root=1-6a3282e0-97c59c0e0a62b74b9e4b0f15"
}
Poll Job Status URL
Use the response returned by your export request to Poll the _links.self.url endpoint periodically until the job status is completed
Download Export
This stage of the process is when Orgvue creates the export file, writes it to a secure file and then sets the job ticket status as completed
Write Export File
After a successful request, Orgvue processes the export, running any calculations and applying filters or projections, then writes the file to secure temporary storage, ready for you to download.
Job status completed
Once the file is written to the temp file Orgvue will set the job ticket as completed
Completed job status response example
{
    "_links": {
        "self": {
            "url": "https://url-signing-ads-serverless-qa-2-vanilla.s3.eu-west-1.amazonaws.com/DIGITAL_LEARNING-f23b0a2c-9974-4aca-b7fe-865679ef0e7c?X-Amz-Security-Token=temporaryAccessToken}",
            "contentType": "application/json; charset=UTF-8",
            "type": "jobTicket"
        },
        "result": {
            "contentType": "text/csv; charset=UTF-8",
            "type": "downloadLink",
            "url": "https://orgvue-qa.eu-west-1.concentra.io/api/canon/v1/temporaryStore?token={temporaryAccessToken}"
        }
    },
    "jobStatus": "completed",
    "_createdAt": "2026-06-17T11:20:03.597Z",
    "_createdBy": "rob.purbrick@orgvue.com",
    "X-Amzn-Trace-Id": "Root=1-6a3282e0-97c59c0e0a62b74b9e4b0f15",
    "_modifiedAt": "2026-06-17T11:20:12.110Z"
}
GET result URL
The job status will include a result url to download the file
Method: GET
"https://{baseUrl}/api/canon/v1/temporaryStore?token={temporaryAccessToken}"
Export Data
The response from the export request will produce a job ticket resource which in turn contains a URL to be polled for the requested export data
Position Title,Email,Age,Current Employee,Date of birth,Department,Expenses,FTE,Full Name,First Name,Last Name,Full time/Part time/Contract,Gender,Grade,Employee ID,Location,Manager ID,NI or Tax number,Other Unique Identifier,Role Start Date,Start Date,Tenure Years,Total benefits,Hours Worked Per Week,_change,_depth,_descendants,_has_unique_id,_height,_is_duplicate,_is_ghost,_is_leaf,_is_orphan,_label,_layers,_level_1,_level_2,_level_3,_level_4,_level_5,_level_6,_level_7,_level_8,_outgoing_count,_records,_span,_subtree
CEO,Anna.Harris@example.com,42.18,TRUE,1951-08-22,Executive,7500,1,Anna Harris,Anna,Harris,Full time,Female,A,1,UK,,HA804326B,,1992-03-19,2006-02-15,3.67,54870,40,none,1,,TRUE,8,FALSE,FALSE,FALSE,FALSE,Anna Harris,8,Anna Harris,,,,,,,,8,1,8,
Finance Director,Yasmeen.Hamidi@example.com,38.11,TRUE,1955-01-22,Executive,3946.09,1,Yasmeen Hamidi,Yasmeen,Hamidi,Full time,Female,D,4,UK,1,IG720732F,,2001-04-10,2011-01-30,5.43,9624,40,none,2,Anna Harris,TRUE,4,FALSE,FALSE,FALSE,FALSE,Yasmeen Hamidi,4,Anna Harris,Yasmeen Hamidi,,,,,,,3,1,3,Anna Harris
Executive Assistant,Josh.Singh@example.com,54.29,TRUE,1958-05-23,Executive,395.54,1,Josh Singh,Josh,Singh,Full time,Female,H1,3,UK,1,EA20752I,,2003-05-17,2011-11-13,0.93,2146,40,none,2,Anna Harris,TRUE,1,FALSE,FALSE,TRUE,FALSE,Josh Singh,1,Anna Harris,Josh Singh,,,,,,,0,1,,Anna Harris
Consulting Director,Doug.Stephens@example.com,36.9,TRUE,1986-11-30,Executive,00/01/1900,1,Doug Stephens,Doug,Stephens,Full time,Male,G,11,UK,1,EG732477D,,1998-07-03,2012-01-19,1.38,2515,40,none,2,Anna Harris,TRUE,5,FALSE,FALSE,FALSE,FALSE,Doug Stephens,5,Anna Harris,Doug Stephens,,,,,,,4,1,4,Anna Harris
Sales and Marketing Director,Meghan.Agarwal@example.com,30.98,TRUE,1971-12-29,Executive,0,1,Meghan Agarwal,Meghan,Agarwal,Full time,Female,H2,21,UK,1,EH243853G,,2008-12-14,2015-02-03,3.47,2500,40,none,2,Anna Harris,TRUE,4,FALSE,FALSE,FALSE,FALSE,Meghan Agarwal,4,Anna Harris,Meghan Agarwal,,,,,,,11,1,11,Anna Harris
Sales Assistant,Evie.Dickinson@example.com,57.93,TRUE,1954-10-03,Sales,0,1,Evie Dickinson,Evie,Dickinson,Full time,Female,F,90,Asia Pac,21,IC625787B,,1992-10-24,2006-12-12,5.85,1500,40,none,3,"Meghan Agarwal,Anna Harris",TRUE,1,FALSE,FALSE,TRUE,FALSE,Evie Dickinson,1,Anna Harris,Meghan Agarwal,Evie Dickinson,,,,,,0,1,,"Meghan Agarwal,Anna Harris"